ShopDreamUp AI ArtDreamUp
Deviation Actions
Daily Deviation
Daily Deviation
February 3, 2011
With Artisan Crafts Week upon us and Valentine's Day approaching, rose tint your world with Tutorial - Polymer clay roses by ~Catgoyle! It's a fabulous tutorial to get you your polymer rose garden growing.
Featured by FantasyStock


Suggested Deviants


Suggested Collections


You Might Like…


Description
I find these really easy to do, and hope this will be pretty clear. If it's not, let me know. It's my first real tutorial. This should work for any polymer clay; work the clay first until it's soft and pliable, then follow the instructions below.
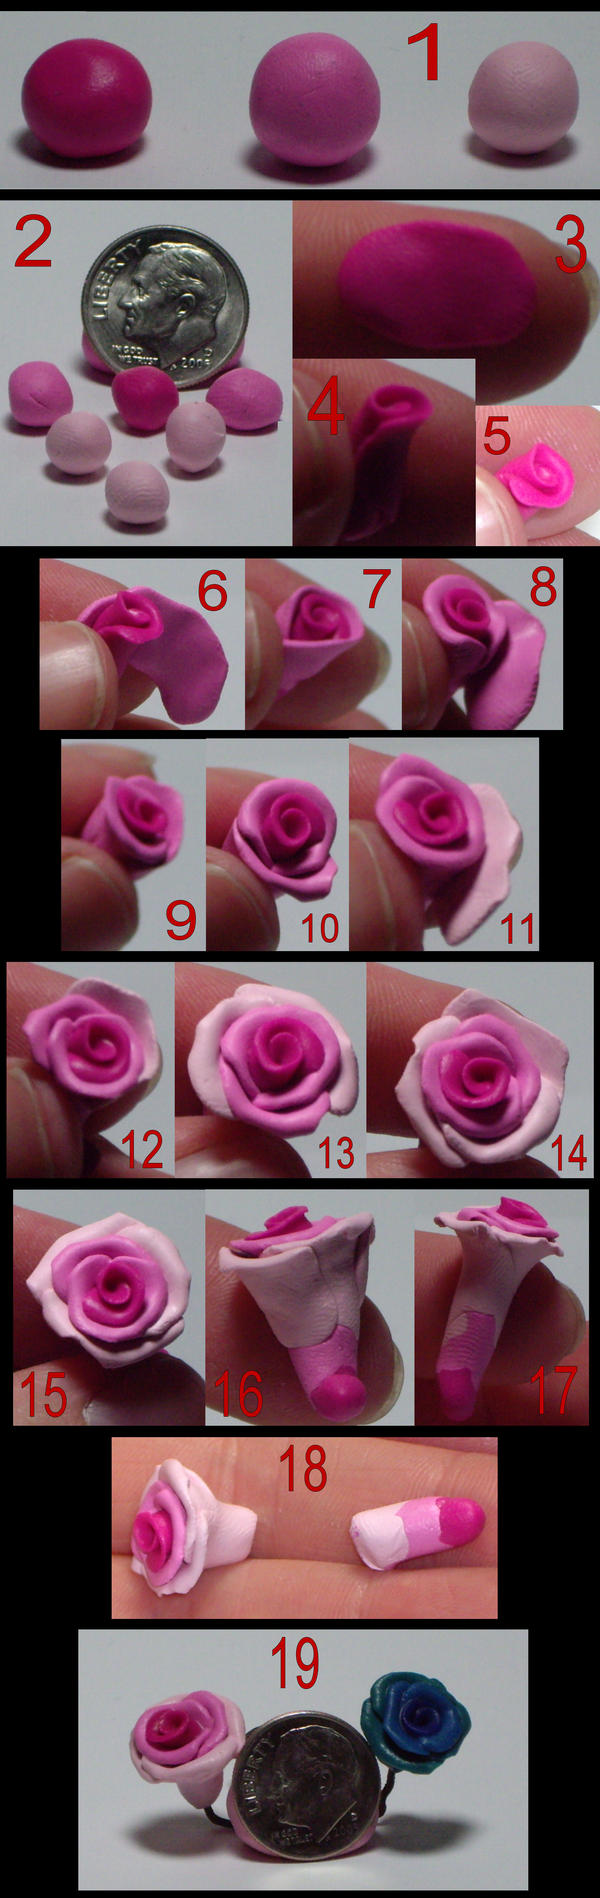
1) Choose your colors. This is a sample set requested of me.
2) For mini roses (what I'm showing), you don't need a lot of clay. The American dime is pretty small; you really don't need much clay to do this. The center will be one ball, the next ring needs two (or three, if you want it a bit thicker), the third ring requires 3 or 4, depending on what you want. I've done it as 1-2-3, and rolled up the amount I'll need as shown here, with only one of the darkest pink for the center and 3 for the outer ring.
3) Flatten in an oblong shape your center ball of clay. The edge that will be the upper edge of the bloom should be flattened/stretched a bit more than the base. Make no real effort for this flattened/stretched area to be perfectly even; having it somewhat odd-edged will enhance the final bloom. Brush finger gently over the clay that will be rolled in the center until fingerprints are removed, or you will have to live with them being there.
4) Start on one short end and roll along the wide length until you have the core of the bloom rolled snugly. If you want it smaller/narrower, now is the time to roll it a bit extra between your fingers (not too hard) to thin it out.
5) Brush the tip of your finger from the center out very, very lightly along the thin lip of clay; this causes it to curl outward slightly, the way the petals should.
6) Repeat step 3; when you've removed your fingerprints from the inner edge, carefully add this side to your core piece. Make sure that the end of the center piece is either centered or not to either end of this piece.
7) Roll it between your fingers a bit so that the clay is snugly attached. Repeat step five.
8) Add the second piece of mid-color clay; I advise an eyeball centering of this one, so that the seam of the first mid-color clay is in about the center of this one. If you're doing three petals in this second step, DON'T center it, but place them more in thirds.
9) Roll it between your fingers a bit so that the clay is snugly attached.
10) Repeat step five.
11-14) Start the final ring. This goes the same as for all of the second ring of petals; space them as you see fit, but try really, really hard not to stack the seams on each row so that they line up, or your bloom will look very odd.
15) Step 5 again; this time make sure to go over all of your petal lips one final time to remove any fingerprints on them with very gentle strokes.
16) Side view; not so pretty, is it?
17) I've rolled it between my fingers (perhaps a bit much) to thin it down a bit. Now it's way too long.
18) Trim off the extra. The tail that's not being used can be saved, blended and (especially if you're doing a lot of the same blend) can be recycled for future use. I find that it usually ends up matching (or close to it) the mid-tone.
19) I use a twist of wire to spear it and bake it on. The clay used for this demo is Sculpey III; I bake it for about 3 minutes. DO NOT OVER BAKE. These burn really quickly. When cooled, I painted over it with Liquid Sculpey and baked it again for a few minutes. Liquid Sculpey appears to keep it from burning, so the length of time is a bit more flexible. I still only bake it for a few minutes, but it's more forgiving at this step. Brush on a very light coating, careful of leaving it pooled in cracks. It does NOT look attractive if you glop it on and let it fill the cracks, trust me...
If you wish to add leaves, they can still be added after this point, or if you want to add anything else to it as well. Use a spot of super glue to attach any findings to it for jewelry, or they will be able to pull out. Super glue should be the last step, after you're done with all the baking.
EDIT:
[link] *kittykitty5150 is the first one to send me a link to the finished product of using my tutorial. Thank you, *kittykitty5150!
Image size
1998x6318px 1.23 MB
Make
PENTAX Corporation
Model
PENTAX Optio S6
Shutter Speed
1/200 second
Aperture
F/5.2
Focal Length
19 mm
ISO Speed
200
Date Taken
Sep 22, 2005, 12:31:43 PM
© 2008 - 2024 Catgoyle
Comments334
Join the community to add your comment. Already a deviant? Log In
They are pretty easy! I might make them for my freinds birthday! Thanks! ")