ShopDreamUp AI ArtDreamUp
Deviation Actions


Suggested Deviants


Suggested Collections


You Might Like…


Featured in Groups


Description
QUESTIONS
WHAT/WHY SNAZAROO?
It's a cake type make-up. It's water-based, meaning it comes off easily with soap and water, or, hell, just water works. It doesn't come off once it dries, and it doesn't dry your skin out too much. To be honest, the only time I've ever had to touch it up was after making out, and that was just because the paint doesn't stay on lips very well. Otherwise, it's good to go!
It's also $7 CND per cake, which will last you a damn long time. I still have tons left, and that's after doing about a dozen Kyoshi warriors, a Joker, and a Padme Amidala, not to mention a few smaller things.
You can also change your skin tone with brown snazaroo. I rushed it so it looked alarming, but I bet it'd look fine if I took my time.
WILL I BREAK OUT?
I've never broken out with Snazaroo, even after 12+ hours, whereas your average cheap red and white Halloween cream make-up will turn your face into a pizza. Snazaroo is also hypo-allergenic.
However, I've been told that some people are allergic to the red pigment in face paint/make-up, so I'd advise doing a skin test before doing full-blown make-up. Put a small bit on a patch of your skin, wait an hour or so, and take it off. If you look fine, continue on, if you don't, don't continue.
HOW ABOUT EATING/DRINKING?
Get ready to use a straw, or at least be restricted to food you can pop in your mouth without touching your lips.
GET READY
- Pluck your eyebrows. Clean them up. If you're brave, take off the outside -- red goes there, not eyebrow. If you don't want to, or your eyebrows are light enough, just paint over them. If you don't want to but don't want your dark eyebrow to show, get a eyebrow sealer and paint that on first. It'll give you a smooth surface to paint over and you won't have to remove your eyebrows.
- Moisturize. You should be doing this anyway, but do it now.
- Make sure your brushes are clean.
- I was already wearing eyeliner, but this isn't necessary.
- I'd advise trying to paint your face at least once or twice before "the big day" where you get your pictures done/go to the convention. These things get better with practice! Someday I'll post a comparison of how my skills have changed just over a few practice runs, and you'll see.
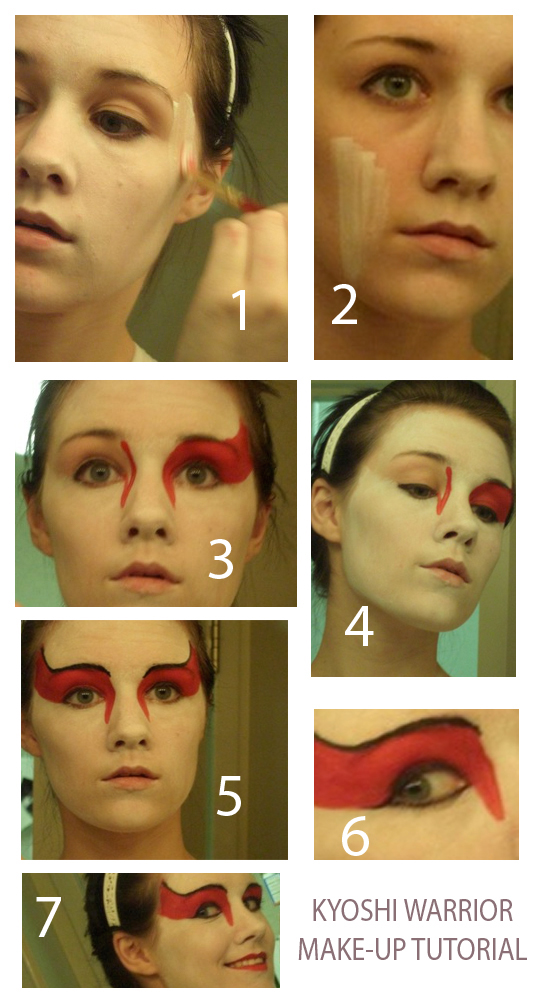
TUTORIAL
1. White paint. First of all, you're going to want to get a water dish (I just use the lid of the make-up tin) and you won't need too much of it. The more water you use, the runnier it is, and usually the grosser it is. Put water on your bigger brush, mix it into the paint until you get a build-up of creamy make-up. Proceed to paint on.
2. Your first few strokes will look streaky, as shown on the left cheek. You can get rid of this by continuing to paint over the area, again and again, until the streaks are gone. Note that if your paint is runnier, the streaks will be harder to get rid of. Use the sponge to wipe off any areas you need to fix.
Some areas you'll want to make thicker than others --- if you do an even coat everywhere, you'll strip your face of any and all definition. That is not cool for pictures.
AVOID THE AREA THAT WILL EVENTUALLY GO RED. GO RIGHT TO THE HAIRLINE, AND PAINT YOUR NECK. I'd suggest painting your ears on the off chance they show, but it's up to you to decide whether you want to be picking it out for the next few days. I also suggest going a bit into your nostrils. Don't cram it all the way up there, but trust me, your nostrils will look HUGE AND RED if you don't. GET YOUR LOWER EYELID BY LOOKING UP AND CAREFULLY PAINTING. Use a smaller brush if you have to.
Wait for it to dry.
3. Get your smaller brush and trace out the outline of the red. Make sure you get the arch UP about 3/5 of the way along your eyebrow and go right to the hairline. Follow the curve in on your nose. Do NOT go under your eye. Do NOT go straight out from the corner of the eye; curve up. If you've waited for the white to dry, it shouldn't go pink anywhere.
4. Fill in the eyelid, too. Close/lower your eyelids while you wait for it to dry properly. It only takes about a minute.
5. Time for the fun part. Get out your eyeliner and fill in your eyebrows, and continue up along the curve of the red. Go harsh. You're a funky kabuki geisha warrior chick!
6. Do your eyeliner, again with the liquid eyeliner. Go heavy on it, and do a cat's eye out along the red. I could have gone a lot more dramatic in that picture, there, and in hindsight I really should have. Then, if you WANT, put on some mascara.
7. Lips! You can use red lipstick if you want, but I like to match the colour to the eyes, so I use the paint. I CANNOT STRESS ENOUGH: paint the lower lip, WAIT FOR IT TO DRY, and THEN paint the top, and wait for that to dry. DO NOT let your lips touch while either is wet. Otherwise you are just going to much everything up and get a funky weird lip shape, and we want pretty lips.
Unpictured 8: if you're a goofball like me, clean the red off of your teeth. Also, WASH EVERYTHING.
Any questions?
WHAT/WHY SNAZAROO?
It's a cake type make-up. It's water-based, meaning it comes off easily with soap and water, or, hell, just water works. It doesn't come off once it dries, and it doesn't dry your skin out too much. To be honest, the only time I've ever had to touch it up was after making out, and that was just because the paint doesn't stay on lips very well. Otherwise, it's good to go!
It's also $7 CND per cake, which will last you a damn long time. I still have tons left, and that's after doing about a dozen Kyoshi warriors, a Joker, and a Padme Amidala, not to mention a few smaller things.
You can also change your skin tone with brown snazaroo. I rushed it so it looked alarming, but I bet it'd look fine if I took my time.
WILL I BREAK OUT?
I've never broken out with Snazaroo, even after 12+ hours, whereas your average cheap red and white Halloween cream make-up will turn your face into a pizza. Snazaroo is also hypo-allergenic.
However, I've been told that some people are allergic to the red pigment in face paint/make-up, so I'd advise doing a skin test before doing full-blown make-up. Put a small bit on a patch of your skin, wait an hour or so, and take it off. If you look fine, continue on, if you don't, don't continue.
HOW ABOUT EATING/DRINKING?
Get ready to use a straw, or at least be restricted to food you can pop in your mouth without touching your lips.
GET READY
- Pluck your eyebrows. Clean them up. If you're brave, take off the outside -- red goes there, not eyebrow. If you don't want to, or your eyebrows are light enough, just paint over them. If you don't want to but don't want your dark eyebrow to show, get a eyebrow sealer and paint that on first. It'll give you a smooth surface to paint over and you won't have to remove your eyebrows.
- Moisturize. You should be doing this anyway, but do it now.
- Make sure your brushes are clean.
- I was already wearing eyeliner, but this isn't necessary.
- I'd advise trying to paint your face at least once or twice before "the big day" where you get your pictures done/go to the convention. These things get better with practice! Someday I'll post a comparison of how my skills have changed just over a few practice runs, and you'll see.
TUTORIAL
1. White paint. First of all, you're going to want to get a water dish (I just use the lid of the make-up tin) and you won't need too much of it. The more water you use, the runnier it is, and usually the grosser it is. Put water on your bigger brush, mix it into the paint until you get a build-up of creamy make-up. Proceed to paint on.
2. Your first few strokes will look streaky, as shown on the left cheek. You can get rid of this by continuing to paint over the area, again and again, until the streaks are gone. Note that if your paint is runnier, the streaks will be harder to get rid of. Use the sponge to wipe off any areas you need to fix.
Some areas you'll want to make thicker than others --- if you do an even coat everywhere, you'll strip your face of any and all definition. That is not cool for pictures.
AVOID THE AREA THAT WILL EVENTUALLY GO RED. GO RIGHT TO THE HAIRLINE, AND PAINT YOUR NECK. I'd suggest painting your ears on the off chance they show, but it's up to you to decide whether you want to be picking it out for the next few days. I also suggest going a bit into your nostrils. Don't cram it all the way up there, but trust me, your nostrils will look HUGE AND RED if you don't. GET YOUR LOWER EYELID BY LOOKING UP AND CAREFULLY PAINTING. Use a smaller brush if you have to.
Wait for it to dry.
3. Get your smaller brush and trace out the outline of the red. Make sure you get the arch UP about 3/5 of the way along your eyebrow and go right to the hairline. Follow the curve in on your nose. Do NOT go under your eye. Do NOT go straight out from the corner of the eye; curve up. If you've waited for the white to dry, it shouldn't go pink anywhere.
4. Fill in the eyelid, too. Close/lower your eyelids while you wait for it to dry properly. It only takes about a minute.
5. Time for the fun part. Get out your eyeliner and fill in your eyebrows, and continue up along the curve of the red. Go harsh. You're a funky kabuki geisha warrior chick!
6. Do your eyeliner, again with the liquid eyeliner. Go heavy on it, and do a cat's eye out along the red. I could have gone a lot more dramatic in that picture, there, and in hindsight I really should have. Then, if you WANT, put on some mascara.
7. Lips! You can use red lipstick if you want, but I like to match the colour to the eyes, so I use the paint. I CANNOT STRESS ENOUGH: paint the lower lip, WAIT FOR IT TO DRY, and THEN paint the top, and wait for that to dry. DO NOT let your lips touch while either is wet. Otherwise you are just going to much everything up and get a funky weird lip shape, and we want pretty lips.
Unpictured 8: if you're a goofball like me, clean the red off of your teeth. Also, WASH EVERYTHING.
Any questions?
Image size
542x1000px 333.73 KB
© 2008 - 2024 dangerousladies
Comments47
Join the community to add your comment. Already a deviant? Log In
she's very lovely excellent makeup