ShopDreamUp AI ArtDreamUp
Deviation Actions


Suggested Deviants


Suggested Collections


You Might Like…


Featured in Groups


Description
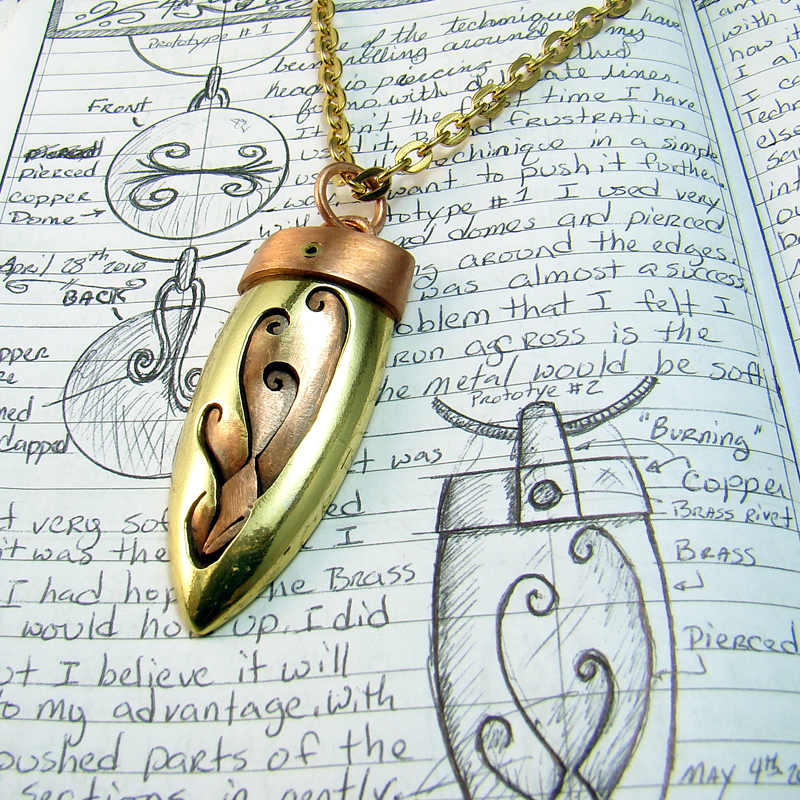
Materials:
Brass body and copper
Design:
Pierced smithed Front, flat back
Size:
1 1/4” x 3/4” x 1/4” (4.45 x 1.91 x .64 cm)
If interested in purchasing -> KennethEWebb.com
Sister Pendant to "Smoke" tallguyken.deviantart.com/art/…
“Bound Frustration” spurred my interest in the art of metal smithing and jewelry design. From it came many series of pendants exploring elements of “Bound Frustration.” One series that everyone whom looked at them referred to as “bullets” has been a reoccurring design throughout my journals. This pendant is the results of 3 years of thought and design.
Concept:
I have always been fascinated by the “bullet” shape of this pendant series. The visual and tactile aspects just feel good to me. When I hold one in my hand the weight and shape are just right. Originally the pendants produced in this style all had the line pattern etched into the surface of the brass with acid. Close up the results of the etching were beautiful and detailed. From a distance though the line work faded into the surface. I want all my jewelry to draw the observer in closer. Each piece needs to be felt and studied at a personal level. The viewer should feel the texture, weight, and presence of the piece.
The piercing technique produced a strong design on the surface of the brass that can be seen and felt better than etching. It also shows the depth of the pendant through the metal being pushed in. This pushed in section of brass retains some of the copper plating caused from dipping the pendant while hot into a pickle that previously was used for copper pieces. The results are a nice contrast of the pierced design and the polished brass. It also pulls the copper color through the piece tying the bale into the body more.
I kept the overall pendant design simple so that the complexity of the pierced design would not be lost. I enjoy the look of a complex intricate element being contained within a simple, less complex form.
Process:
I start by cutting out two “bullet” shapes from a flat sheet of brass. After annealing one or both of the cutouts, they are smithed into a boat shape. It usually takes two or three smithing rounds (annealing and hammering) to get the desired shape. I will normally smith both halves. Once one or both halves are smithed, I will scribe and then pierce the design into the front half. The edges of the halves are matched and prepared for joining. A file is used to remove remaining hammer marks and smooth the surface. After that they are joined together by torch and solder.
Before the metal has a chance to cool, I quickly quench it in the pickle solution. I do not use separate solutions for copper and brass so the brass tends to get plated with a thin layer of copper. The piece is removed from the solution and washed off. At this point the metal is soft from being annealed during the soldering process. Using a plastic scribe, I carefully push the metal inside the pierced design. I will try to create some depth to the design itself.
The surface of the brass is sanded smooth and polished to a high shine. The parts of the design that were pushed in retain file marks and the copper plating. This creates a beautiful difference between the smooth brass surface and the rough copper plated section.
The bale is produced by cutting a strip of copper large enough to wrap around the brass body. After roughly fitting the strip at the top of the “bullet” body, it is soldered close and refitted. Another small strip is cut and soldered on top of the bale, capping it. Using recycled electrical wiring, I design and attach the part of the bale the chain will go through. The bale is again fitted to the brass body and a hole is drilled through both. They are riveted together with a brass tube. The bale is filed and sanded. From this point I either leave the bale textured with the sanding or will polish it to a shine. The whole process takes a total of 6 hours from start to finish. The finished pendant is solid and uniquely beautiful, drawing the attention of those who see it. Those more daring will ask to see it or even hold it.
I intend for the pendants to tarnish overtime, so a protective clear coat was not applied. The idea is for the pendant to change with the wearer through their journey together. The wearer also becomes part of the process since it is the oil from their hands and body, along with the people they let see it, that causes the overall change. To see what the end result may look like see links below.
Links:
Process steps: fav.me/d2q1kd7
“Bound Frustration” : tallguyken.deviantart.com/art/…
Tarnish Example (2 to 3 years): tallguyken.deviantart.com/art/…
Tarnish Example (6 months of constant wear): tallguyken.deviantart.com/art/…
Other design examples mentioned in description:
tallguyken.deviantart.com/art/…
tallguyken.deviantart.com/art/…
Image size
800x800px 787.27 KB
Make
SONY
Model
DSC-H9
Shutter Speed
10/130 second
Aperture
F/6.3
Focal Length
5 mm
ISO Speed
80
Date Taken
May 16, 2010, 12:36:13 AM
© 2010 - 2024 TallGuyKen
Comments29
Join the community to add your comment. Already a deviant? Log In
gorgeous