ShopDreamUp AI ArtDreamUp
Deviation Actions


![Revised RainWing Concept [UPDATE]](https://images-wixmp-ed30a86b8c4ca887773594c2.wixmp.com/f/6f4b06a6-180f-4549-acbf-58f051f391fc/dee1ndo-7076b613-36d4-4305-a9f0-01d02a8878e0.png/v1/crop/w_184,h_184,x_49,y_0,scl_0.054325361677,q_70,strp/revised_rainwing_concept__update__by_tearyidle_dee1ndo-92s-2x.jpg?token=eyJ0eXAiOiJKV1QiLCJhbGciOiJIUzI1NiJ9.eyJzdWIiOiJ1cm46YXBwOjdlMGQxODg5ODIyNjQzNzNhNWYwZDQxNWVhMGQyNmUwIiwiaXNzIjoidXJuOmFwcDo3ZTBkMTg4OTgyMjY0MzczYTVmMGQ0MTVlYTBkMjZlMCIsIm9iaiI6W1t7ImhlaWdodCI6Ijw9MzM4NyIsInBhdGgiOiJcL2ZcLzZmNGIwNmE2LTE4MGYtNDU0OS1hY2JmLTU4ZjA1MWYzOTFmY1wvZGVlMW5kby03MDc2YjYxMy0zNmQ0LTQzMDUtYTlmMC0wMWQwMmE4ODc4ZTAucG5nIiwid2lkdGgiOiI8PTcwMDAifV1dLCJhdWQiOlsidXJuOnNlcnZpY2U6aW1hZ2Uub3BlcmF0aW9ucyJdfQ.gOz0rl6E1thqCw2LSxQSk8bhB9Z7XvyG25sIueejENw)
![Revised RainWing Concept [UPDATE]](https://images-wixmp-ed30a86b8c4ca887773594c2.wixmp.com/f/6f4b06a6-180f-4549-acbf-58f051f391fc/dee1ndo-7076b613-36d4-4305-a9f0-01d02a8878e0.png/v1/crop/w_92,h_92,x_25,y_0,scl_0.0271626808385,q_70,strp/revised_rainwing_concept__update__by_tearyidle_dee1ndo-92s.jpg?token=eyJ0eXAiOiJKV1QiLCJhbGciOiJIUzI1NiJ9.eyJzdWIiOiJ1cm46YXBwOjdlMGQxODg5ODIyNjQzNzNhNWYwZDQxNWVhMGQyNmUwIiwiaXNzIjoidXJuOmFwcDo3ZTBkMTg4OTgyMjY0MzczYTVmMGQ0MTVlYTBkMjZlMCIsIm9iaiI6W1t7ImhlaWdodCI6Ijw9MzM4NyIsInBhdGgiOiJcL2ZcLzZmNGIwNmE2LTE4MGYtNDU0OS1hY2JmLTU4ZjA1MWYzOTFmY1wvZGVlMW5kby03MDc2YjYxMy0zNmQ0LTQzMDUtYTlmMC0wMWQwMmE4ODc4ZTAucG5nIiwid2lkdGgiOiI8PTcwMDAifV1dLCJhdWQiOlsidXJuOnNlcnZpY2U6aW1hZ2Uub3BlcmF0aW9ucyJdfQ.gOz0rl6E1thqCw2LSxQSk8bhB9Z7XvyG25sIueejENw)


Description
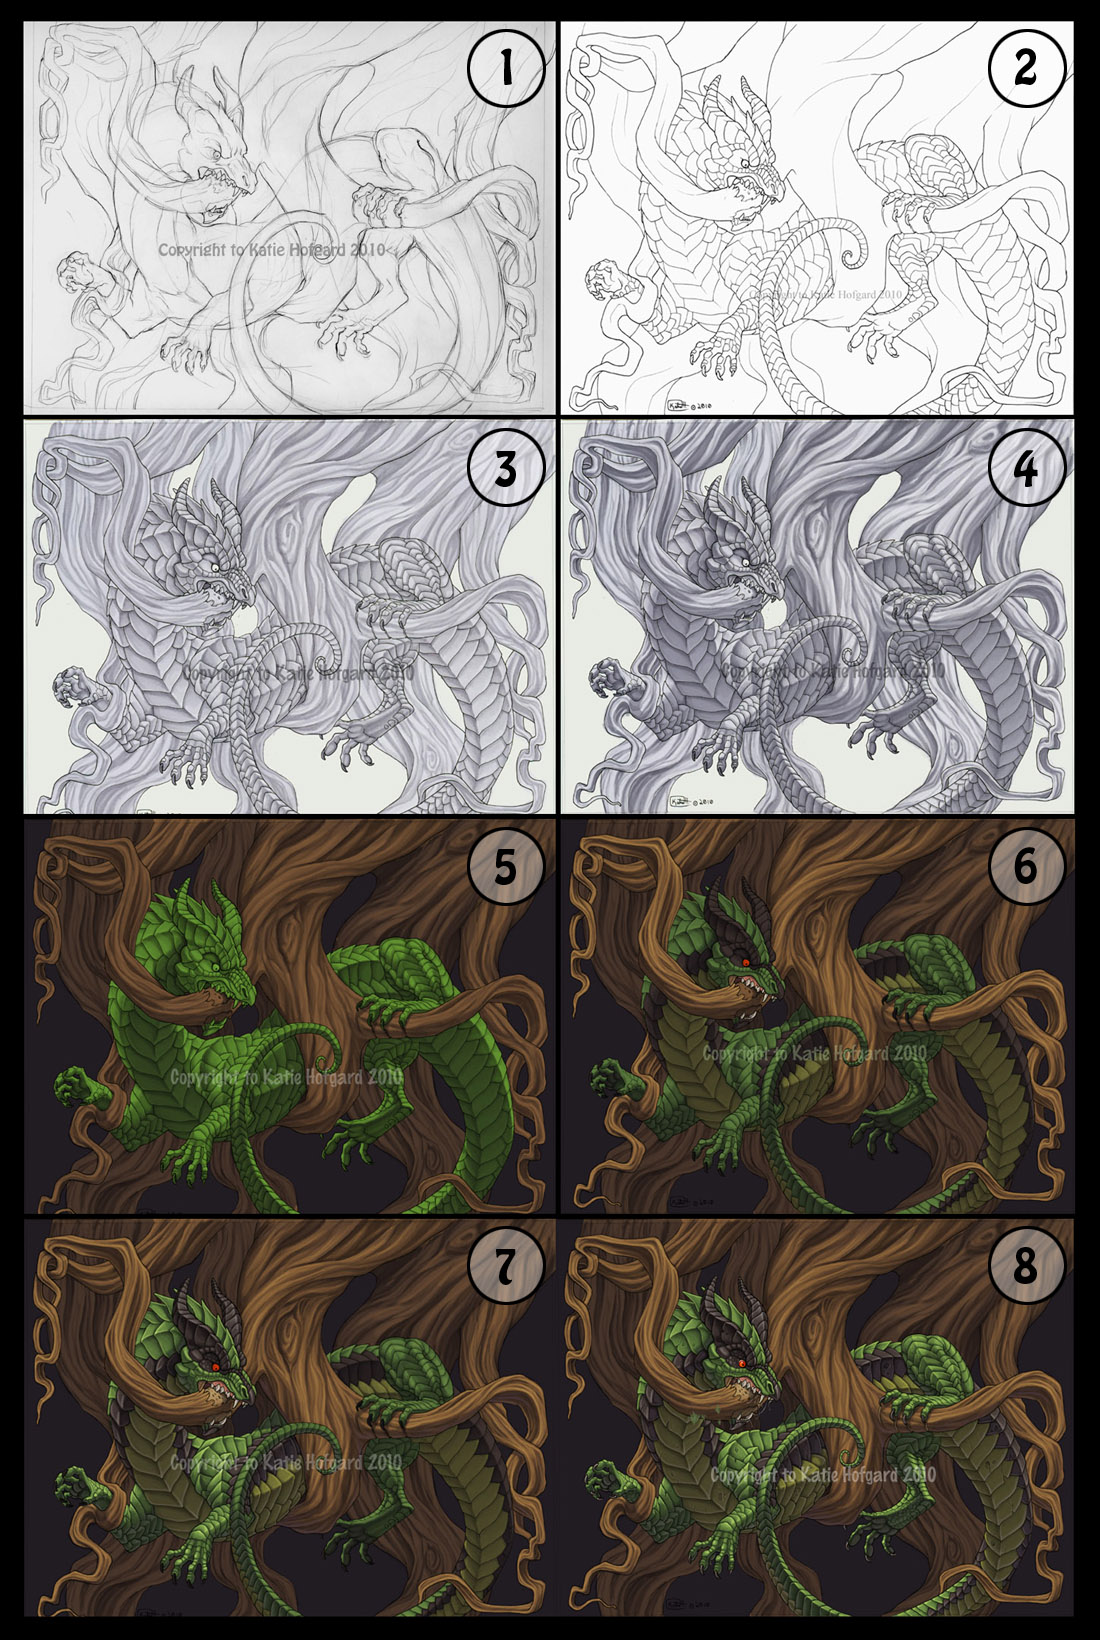
While I was working on my piece of Nidhogg, I captured some WIP images I thought I'd share along with a walkthrough!
1) Sketch stage. Working out basic shapes, anatomy and a good composition are essential for a piece to look good once painted. He looks a little naked without scales, hehe.
2) Ink stage. Scales have been worked out in the sketch stage. I transfer my drawing to a sheet of smooth bristol using my light box and black miron inking pens
3) Greyscale Texture. Using a variety of cool grey markers, I work out the texture. This way it's all there before I get into the nitty gritty of the color stage, and can focus on color completely separate from texture.
4) Greyscale shading. At this point I've scanned the marker drawing and working digitally in Photoshop. I've added shadows using a layer set to multiply.
5) Base color. The original marker drawing layer is set to multiply, and underneath that I lay in base colors. The dragon and the roots are on separate layers so I can manipulate and paint them separately.
6) Details and a little Paint. I've worked out what colors I want the dragon to be at this point. Now I start painting on top of everything on a new layer (set to normal). I use the regular photoshop round brush with varying opacity, diameter and hardness. I have a tablet, so pressure sensitivity in the pen is very helpful to get varying strokes.
7) More paint. I continue to paint on the surface, building up the volume and the lights with lighter more saturated and warmer colors as I go.
8) I notice Nidhogg is looking a little "brand new" with no texture. So I add pock marks and broken scales on a new paint layer. I also thought I'd try adding moss on the roots, but since I didn't plan for it in the sketch stages it looked awkward and I abandoned the idea. I did add some mushrooms into the final piece so distribute the red colors a little more and make the roots a bit more interesting.
And here's the final piece!
Image size
1100x1640px 544.92 KB
© 2010 - 2024 KatieHofgard
Comments55
Join the community to add your comment. Already a deviant? Log In
very interesting... i still have to get into the habit of using a light box or a window to transfer drawings. i keep trying to draw everything in photoshop which makes it a challenge, but i have done it before.