


PE Photomanipulation: Ask Me Anything!
One of the activities for Project Educate: Photomanipulation was for the community to ask questions from more experienced community "experts." For "Ask Me Anything," community members came up with ten excellent questions for ten Experts to answer. Having had time to peruse and consider the questions asked, the Experts kindly returned the answers to be included in this news article. Many thanks to the deviants asking, as well as a huge thank you to the Experts for taking the time to come up with such succinct, detailed, and helpful answers.

Answered by nitchwarmer
iAmoret,
There are many brushes and stock images you can use here on dA; you can find them here: Recources Applications. Just pick your poison and add it to your photo, then play with your levels and layer adjustments and there you have it. Most of the time they look like what they are, a quick fix.
Then on the other hand, it's so much faster and easier to make it yourself in Photoshop. I am assuming that's what program you are using. There are many tuts on doing this and it's very easy. After looking closely at Ahmed-R-Shalaby's image, I am sure that's what they did. If you look closely at the foreground you can see where they erased the fog from the rocks.
I found you a very easy video that explains the whole process and it's a breeze to understand. "How to Make Realistic FOG & MIST " is a Photoshop tutorial showing how to make realistic-looking fog & mist and uploaded to You-Tube by Blue lighting TV. I hope this helps you.
Now go forth and create!
Here's the tutorial: www.youtube.com/watch?v=CgogMP…


and tell me what's wrong with this pic? Thank you.
Answered by TheFantaSim
I like this deviation, and I can see how it appeals to viewers; however, as I understand, you want to know how to push this deviation into the "wow factor".
First of all, I think the water is flat. It would give it more of a "tank water" effect if you place a water texture over the tank area using a "Soft Light" property. Something like this one:
Then I have a couple of ideas to push this a little further.
1. Simply, more dolphins looking at the child. Cows like doing that, all watch the same person, and it's interesting to see that. So why not more dolphins?
2. I know it's done a lot, but a mermaid could help make this more than simply about the dolphins. Something like a model from here:
With a tail from here:
Or any way you like, as long as it's a mermaid also looking at the little girl.
If you want something on the surreal side, put a person in there waving at the little girl.
Now for some criticism:
1.The bubbles are coming from behind the dolphins when they should be coming from their mouths and going upwards. And I would make the bubbles look more realistic. The same should happen if and when you add more dolphins and, maybe, the mermaid. Bubbles can create something like this, which is realistic::bigthumb34409685:
2. The bubbles from the tail are a little out of place. To me, it takes away from the whimsical image that's already been started simply by the dolphins looking at her.
3. The shadow from the little girl and the cat is behind them, which it should be since the light is coming from the fish tank. But you have their backs with light hitting them as well. The back should be black as well.
I hope this helps you with this deviation and images of the future. Good luck!


Been asking around and searching on YouTube, etc... trying to find the method used so widely here on DA in creating that fantasy, painterly skin look. Though I know it may not be considered 'fantasy' or 'gothic' but I find this effect in that majority and a style I just adore.
I know there is a style of actually painting right upon the skin, and of course, adding painted elements as highlights, lighting, etc in a manipulation method... But I don't think for the skin it's just a smooth tool or something thereof... Gaussian blur truly over does it, even with masking... I still don't think that, nor the smudge tool are the effects being used here, completely.
Do you think you could lead me in that direction to a tut or find someone who would be willing to uncover the name of this style and a How To? I've asked several artists here - willing to pay - but with no response. Would really appreciate the help... and many thanks again!!" ~ JERRY
Answered by IdaLarsenArt
How to achieve that painted skin look:
There are as many ways to do skin using Photoshop in photomanipulations as there is artists working in this category, but I will try explaining a very simplified version of my personal process... (I often go back and forth in all these processes many times before I am satisfied with the result!)
1. First of all, I start out with playing a little with ‘Image> Adjustments> Brightness/Contrast’ to achieve the glow and look I wish to get. Same goes for 'Image> Adjustments> Colourbalance', 'Image> Adjustments> Layers' and such, until I have the general outcome I want to proceed with.
2. Then I copy the figure and add it to a new layer on top of my old layer, so I have a crystal clear version of it at hand.
3. Then I work on the first layer, by adding the 'Filter> Blur> Surface blur' (the 'Radius' & 'Threshold' usually set to '5'), then I sometimes use the 'Edit> Fade' to fade it a little if I feel the blur is too much..
4. Then I go to the second 'clear' layer that I had made on top of it and erase everything except for the eyes & mouth, 'with the 'Eraser tool' set to a 'soft round brush' so that the edges are not sharp. That way the eyes and mouth are clear even if the skin looks smoother.
5. Then I use the 'Dodge' & 'Burn tool' to create highlights & shadows (usually setting the 'range' to 'midtones' & the exposure to anything from 10-20 depending on how stark a contrast I wish to achieve) to where I wish to either enhance the natural lighting of the photo or to create a new lighting source. I repeat that step several times with different sized brushes (always a soft brush, so the edges won't be too sharp).
6. Then I make a new layer on top of the one with the eyes & mouth, and start painting layers (colour selected with the 'Eyedropper tool' from tones already in the models skin tones) of new skin with a soft brush, 'opacity' set as low a '25'. I often cover the entire face and everywhere there is skin showing, with a thin transparent layer (due to the low opacity). Then I add other layers on selected places where I wish to lighten or darken the skin. So many transparent layers on top of each other on select places, each one slightly smaller than the first and in lighter colour tones where I wish to get the highlights. When I have done all this in various layers I go to each 'skin layer' and 'erase' the edges of each, again with low opacity, because even with a soft brush, the edges will be visible otherwise..
7. As a finishing touch I 'zoom in' to the places on the skin where there would be slightly more 'glow' or 'pores' and add various 'paint spatter' brushes via the 'dodge tool', again all low opacity, all brushes tiny in size, and then add those small 'specks' from the brush to the corner of the eye, nose bridge, corner of mouth, just on top of the eyebrow above the eye, on forehead etc... anywhere you feel that a slight shine would appear on real skin.
Like mentioned before, I spend a lot of time on all layers and often experiment, but these are all basic advice, and now the best you can do is to go ahead and experiment to gain your own style
Also, remember to always keep a 'PSD' version of your art work with all the layers intact in separate files, preferably several as you progress, in case something goes wrong, or your experimenting ends up ruining it all of a suddenThen you can always delete all after you are sure you have completed it to your own satisfaction!
I hope this gave you a few useful ideas to go on
Best Wishes
Ida aka IdaLarsenArt

Answered by FrozenStarART
Deep shadows on a body can be reduced, to even out the tones a bit more, but cannot be removed completely without looking flat. Even if painting over, shading based on the light setup of your image is taken into consideration to distinguish the highlights & shadows areas.
It also depends on the type of file you are working with. A .jpeg leaves little room for drastic adjustments in the light setup like that, while a raw file gives you more freedom to adjust the lights.
From experience I learned that shadows are a lot easier to add than remove. So what I always do is make the best of the image I've got and try to work the background around it. Find a background that has a similar light setup, combine them and use adjustment layers and/or good old-fashioned dodge & burn and/or painting to enhance the features of both until it looks good and natural to your eye.

Answered by vacuumslayer
I discussed this a bit in my "Somerset Digital Studio" article. (Spoiler alert: I was really impressed with one manipulation I saw awhile back and wanted to do an homage to the style, while putting my own spin on it.) But I'd like to add that I think part of the reason I've tried to develop a style is because A.) I'm a bit intimidated by a lot of the manipulators around here, and I knew I had to develop of a recognizable style if I wanted to stand out among all the talent on display. And B.) I noticed that most of the popular artists had, again, a recognizable style. So I thought having one myself might "put me on the map," as it were.
I think I reached the place I'm at through trial and error. I threw a lot of things to the wall, but found what stuck was the stuff that seemed to resonate with people, again and again. I kept a close eye on my print sales, my Favorites, and most importantly what felt right to me, and then sort of settled into my "dolls."
I find that there are a lots of manipulators out there doing "memeish" things that are incredibly lovely. That niche is filled; there really isn't much room for me. So I try to go down a different path and keep my fingers crossed that it will work out for me. So far it has.

 achieve as if the photo
is digitally painted instead of photomanipulated?"
Answered by NiAnluain
The description of photomanipuation on dA: Photomanipulations are images that have been composed of two or more photographic elements to create something new.
Yes, Melania has done a photomanipulation. I have not looked at her credit list before I did my evaluation so I could give it my proper attention, plus that's cheating!I'm meant to be a expert - somehow....
When you look at this picture there is 3 distinct planes, and approximately 3-4 photographs. There is the main background which is a blurred temple (most likely Gaussian at 30+px), a secondary wall and grave stone in the mid ground - again somewhat blurred and finally the model at the foreground. To achieve this "blur" seems to be used by most digital artists; there are other ways but it's the most popular. Melania had to show masking skill in blending the back two photographs to make a lovely dark and dramatic background.
The model treatment can be achieved three ways (there could be more, plenty of ways to do things in Photoshop) in my experience; however, it is a guess, as I don't use these techniques on models.
The first is using the smudge tool and carefully smudging the skin and hair, paying particular attention to the detail around the face. Reducing the smudge value will help with this.
The second is an overpaint, where a clean layer is put over the model and using color samples from the main image, the model is painted over.
A third is surface blur.
I've no idea if a tablet or mouse was used - I'd guess a tablet possibly if a gun was at my head.
Either of these 3 techniques give a "painted" feel to any photomanipulation. It just depends on your skill-set and workflow which you use. The scars then would be added at the end once the model was complete.
Color adjustments were probably done at this stage for the model blending.
For the highlights and details of the model and cat, I assume that these were painted in last using a hard edged brush and varying the opacity/flow.
Final textures, sharpening and color adjustments would complete the image.
It takes practice and a lot of it to get a lovely painted feel to photomanipulations. Practice & Patience = Perfect! The 3P Rule according to me!
Eithne


Hugs
Vicky <3
Answered by kuschelirmel
In my opinion, the secret to good blending is a) patience and b) good observation of perspective & light and c) the ability to put these two things into practice, which is where the technical part comes in. The first thing you do is choose your stock (or at least your "starting stock", doesn't have to be everything down to the T) and cut it out very (!) roughly (like lasso-tool rough), just enough so you can get a feeling for the pieces fitting together. What you need to look out for now is to get the proportions right and making the perspective match. For example, say you have a room and you want to put an object on a table; it should be photographed from the side or from just slightly above to match the scene. An object that was sitting on the floor and the photographer was standing next to it photographing downward will look off. And you can't transform the object to match up either, you'll only distort it and make it look flat. So if something doesn't fit, be patient enough to search for a different image.
Next up, you can start cutting out the pieces in earnest, which needs skill and patience. There are so many different techniques for cutting you can use; I would suggest you try to get yourself familiar with them all. Because there is no "right way" of doing this, it's always a question of what you're cutting out and what you personally feel good with.
Once you've got the individual images cut and positioned, it's time to think about lighting your scene. At the moment, each of your images has a different light source with different light colour and intensity, and now you have to figure out where in your scene the light comes from - one source? multiple sources? which is the most dominant? - and adjusting your image parts accordingly, adding shadows and highlights. This is not something you can explain easily, but I try to show you my way of doing the lighting in my two-part lighting tutorial - part 1 - part 2. It's something you need to develop an eye for by observing images (not just photographs but also manips, paintings, 3D renders, etc that you like), and finding out how the light situation is created, and why you like it so much and what you need to do to achieve something similar for your own work.
Jasmin
I'm very new to deviantArt and to photomanips. I notice a large variety of digital artists achieve an almost painted quality to their artworks. How is this done? Is it some type of combination of layer effects and color adjustments? Do they actually paint over the photos in their manips? I would love to know how to achieve this wonderful effect.
Examples:
:bigthumb259500577:
:bigthumb296579415:
:bigthumb258679092:
:bigthumb296579415:
:bigthumb258679092:
Thanks for your time; hopefully this question isn't too broad
Answered by robhas1left
First I would like to welcome you to DeviantArt and thank you for your question. We were all new to DeviantArt at one time, and, like you, I was new to photomanips not so long ago. As with any art form, it takes practice and application. So practice, practice, practice! Continue to ask questions and know your tools, i.e., Photoshop, Gimp, Paint Shop, etc.
Now, on to your question, the effect you’re wanting can be achieved in a number of ways, most of which are quite simple once you’ve done it once or twice. (Practice) Just remember, the appearance will vary depending on your starting stock image. You provided me with three examples of what you want to achieve so I decided to make you two tutorials. The first will be using a stock image used in one of the examples you provided. The second will be a random stock image and will be using a different method to achieve a similar effect. These tutorials were done in Photoshop CS5. I hope you find these tutorials useful. Tutorial One and Tutorial Two.

Answered by simoneheld
Photomanipulations are only done digitally nowadays. They used to use different tricks in former times, when they didn't have computers yet.
But what people do in a traditional way today which is similar to photomanipulating is collages, i.e. putting different pieces of newspapers and magazines together to create a new and interesting concept/artwork. See here: Traditional Collage or Traditional Collage Two.


I always end up clumping things together and making them look side by side. I hope that's clear enough, thanks!"
Answered by tamaraR
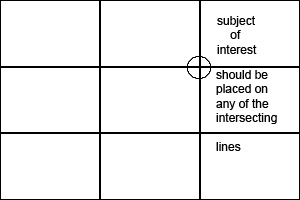
The correct use of space has everything to do with the composition. You need to create a balance in your image so your composition doesn't look off. By using composition techniques correctly you can put the focus on your subject and not have your viewer be distracted by everything else. Just moving a few elements in your manipulation can have a huge impact on how the viewer experiences the picture. Composition techniques apply to all 2D art... meaning techniques used by digital painters can be used by photomanipulators as well.
One of the most well known composition rules is the Rule of thirds. When you divide your canvas into thirds horizontally and vertically you get intersecting lines. These intersecting lines are also called your focal points and are the best spots to place your subject (also known as Object of interest).
When using this technique the viewers eyes will be drawn to your subject.
Concept artists are masters at this, and I would definitely recommend studying their art to get a better feel of what makes a great composition. Of course, placement of the subject isn't the only thing that determines if you made a powerful composition or not. Leading lines, details (or lack of it), saturation, contrast, color and framing all help you make a better composition. All of these things should put the focus on your subject. I will not go into detail on these subjects because they are explained in detail in the tutorial links below.
So the question should not be how to add space to your manipulation but how to correctly use it.has written a great article to get you acquainted with composition techniques in photomanipulation:
Other really helpful tutorials include:
Concept art tutorial about composition ~ Phil Straub composition tutorial ~ An in-depth tutorial on landscape composition rules.
Creating a grid of the rule of thirds ~Golden Ratio grid extension PS ~ Golden Crop extension for PS
I hope this will bring you closer to creating the photomanipulations you want. Keep working hard and experimenting and most of all have fun doing it.


So, there you have it. I learned a lot by reading all the wonderful answers and checking out the many links provided. Again, thanks to all the participants!
WDWParksGal
.