How to: Custom Boxes
Through this tutorial you can teach yourself how to create a Custom Box. This could be used for anything from customizing your journal skin to adding more features to your website. In my view this is a quiet medium level tutorial and won't take you any more than 45 minutes to figure out and follow. Its would be more helpful if you have read the previous editions of this series in order to understand this better (links are at the bottom). But either ways I have re-introduced all the CSS styles in this tutorial.
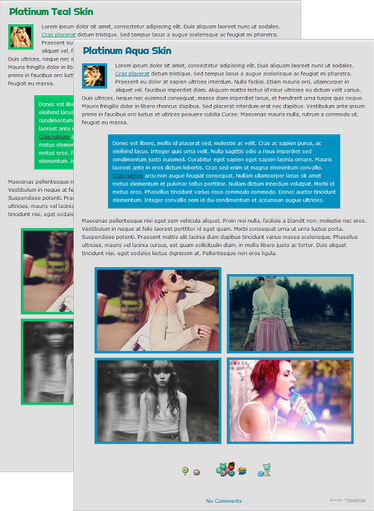
What we shall create:
Your Title Here
Lorem ipsum dolor sit amet, consectetur adipiscing elit. Sed id mi ac orci consequat varius. Morbi molestie gravida mauris eget vehicula. Nam volutpat sagittis ultrices. Fusce eget libero lacus, eget laoreet dui. Maecenas consequat risus odio, vitae iaculis ligula. Nunc dignissim viverra varius. Aliquam ligula risus, condimentum eu malesuada eu, porttitor a nulla. Nam nunc velit, condimentum vel auctor in, mattis sed orci. Vestibulum ante ipsum primis in faucibus orci luctus et ultrices posuere cubilia Curae; Ut porta ullamcorper vehicula. Nunc convallis tincidunt libero, vel luctus ante ornare at. Proin vehicula hendrerit erat sit amet ultricies. Etiam suscipit ullamcorper tincidunt. Pellentesque ultrices mollis libero eget placerat.
The CSS code used:
.box1 {
margin: 10px;
padding:10px;
background: #fff;
background-image: url(http://fc04.deviantart.net/fs70/f/2012/285/e/4/boxbc_by_cartondock-d5hk644.jpg);
background-repeat: repeat-x;
border: 1px solid #666;
color:#666;
box-shadow: 0px 1px 2px 0px #999999;
min-height: 150px;
border-radius: 3px;
}

.box1 .box1text {
color:#8dc63f ;
text-shadow: 0px 1px 0px #fff;
font-size:18px;
font-weight: bold;
margin-left:5px;
position:relative;
left:0px;
margin-top: -3px;
cursor: default;
}

.box1 .box1des {
color:#666 ;
text-shadow: 0px 1px 0px #fff;
margin: 20px;
margin-top:20px;
}

.box1 .box1button {
width: 100px;
color:#fff;
text-align:center;
padding:5px;
border-radius: 3px;
background: #00bff3;
cursor:default;
box-shadow: 0px 1px 1px 0px #e1e1e1;
}
.box1 .box1button:hover {
background:#f4a61d;
}
.box1 .box1button:active {
background:#ed145b;
}
Note that some of the CSS styles such as the box-shadow, text-shadow and border-radius are CSS3 properties and therefore are not compatible with most old browsers. This statistically means that about 15% of the internet users cannot see CSS3, however this doesn't mean your CSS won't completely work; the CSS3 styles would just be omitted.
If you are interested in using CSS3 properties without any compatiblity issues you can follow the solutions at
www.netmagazine.com/features/t…, in order to get the same CSS3 effects with the standard 100% compatible CSS.
The HTML code
<div class="box1"><div class="box1text"> YOUR TITLE HERE </div><div class="box1des"> YOUR TEXT HERE </div><div align="right"><div class="box1button"> BUTTON TEXT HERE </div></div>
What it all means:
The CSS used here in this tutorial is the same CSS I have introduced in my previous button tutorials, but I would be re-introducing them here as this is a completely new tutorial and so that you don't have to check back on the previous tutorials all the time.
The main new CSS I have introduced here are some combined CSS selectors (i.e. : .box1 .box1button), to understand them better you can read the previous
tutorial about CSS selectors by
miontre  background:
 This states the background color and it has to be a HTML color code.
color: This is the text color and it is also in the form of a HTML color code.
padding: This is the space you want to leave between the content inside the CSS button and the edge. Has to be stated in Pixels (1px / 5px /...)
border: This is the border, firstly here '1px' states the width of the border, 'solid' is the border style and can be changed to 'dotted' or 'dashed' to get the desired effect, '#000' is once again the HTML color code which states the color of the border.
border-radius: This can be used to state how curved you want the edges of the border to be; if you set it to '0px' then you will have a perfect square and if you set it to '5px' you get curved edges. (can range from 0px - 90px)
font-size: The font size in pixels.
text-shadow: This is the text shadow. The first '1px' states how many pixels to the left the shadow should go. The second '1px' states how much to the bottom the shadow should go. The final color code states the color of the shadow.
text-align: This is the text align (just as the name says): Can be set to either: Left/Right/Center
max-height: & max-width: States the maximum height and width in pixels.
cursor: This sets the cursor: can be either auto/default/pointer/text/help.
 .button1:hover { }
 This is the hover effect, as in when the cursor is over the button this replaces the original CSS to the values in-between these tags. Such as here it changes the background color, border and text-shadow to a bluish color when the cursor is over the button.
.button1:active { } : As same as the hover effect, this code states the CSS which should be used when the button is pressed.
background:url() : This piece of code it used to set an image as a background instead of a color. You have to place a full link to the image in-between the brackets.
background-repeat: This is used to define in what direction the background-images is repeated. By default the image would repeat in both the x and y directions. However you can use the different values below to change this.

The First "-2px" states how much to the right the shadow is, (negative values move it to the left)
repeat : Repeats in both directions, both vertically and horizontally.
repeat-x : Repeats only vertically.
repeat-y : Repeats only horizontally.
no-repeat : Does not repeat the background, therefore the background image is only placed once.
box-shadow: -2px 2px 0px 0px #999;
The First "-2px" states how much to the right the shadow is, (negative values move it to the left)
The Second "2px" states how much to the bottom the shadow is, (negative values move it to the top)
The third pixel value states how dispersed (/shaded/blurred) the shadow should be.
The fourth pixel value states how thick the shadow should be, if set to 0px then the shadow would be the same size as the box.
The last HTML color code states the color of the shadow. position: If you specify position:relative, then you can use top or bottom, and left or right to move the element relative to where it is in the document.
eg: 'top:1px;' and 'right:1px;'You may find this CSS a bit lengthy, but its the nature of CSS and most of the time you have to use a lot of CSS in order to get a nice effect to your HTML. But remember its the same set of styles we repeat throughout the whole thing and therefore mastering each style (such as Box-shadow and Border) separately would indeed get you the best results from CSS. Hope you found this tutorial useful and if you run into any problems of any sort with the CSS feel free to ask here or send me (
UJz ) a note.