ShopDreamUp AI ArtDreamUp

Deviation Actions


Description
Hiya guys! C:
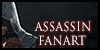
Aspromised threatened, here's the tutorial/WIP thingy of Ezio in Venice! <:
More than a tutorial, I'd say it's a peek into how I paint… c:
Hope you enjoy it! <: (Download it for full size! C (Smile)")
Program used: Photoshop (but it's the same with every painting software, I guess…)
Brushes: chalk brush and oil brush
Layers: background, lineart (hidden and then deleted almost right away), Ezio, overlay for the adjustments.
STEP 1:
After filling the background with a light purple, I did a not-so-detailed lineart, then started painting on top of it with a chalk brush, just to block in the colours, especially in the face. Basically I started to get a feeling on where shadows and lights would fall.
STEP 2:
I started using the oil brush, which is the only brush I used till the end of the piece. As you may see, I started detailing Ezio's face a bit.
Note: I don't really start on the body until I don't get the face right… It's a quirk of mine, I guess… xD
STEP 3:
FLIPPING! I can't stress enough how important it is, to check the balance of the image and somehow highlight what you're doing wrong… C:
STEP 4:
now that I was kinda satisfied with the face, I moved on to the body.
Since I wanted to keep a rough feeling, I didn't detail this part too much; if I want to be really accurate, I usually do a proper lineart first, instead of starting with blotches of colours… C;
STEP 5:
more details on the clothes, especially his cape and shirt.
STEP 6/7:
flipping again! C: More attention on the hood and its folds, and on the torso. I guess it was at this point I noticed the proportion were quite off, so I had to resize his cape-covered shoulder and "stretch" his body (using the resize tool and the warp tool, the latter mainly to adjust shape and positions of the red stitches on the shirt).
STEP 8:
starting the background with blobs of colors just to get a felling on where buildings would be.
STEP 9:
more details on the background.
STEP 10:
blurred the bg using the "movement blur" C:
STEP 11:
after rotating the bg a bit, because it wasn't in the right perspective, I created a new layer set on "overlay" and adjusted the colours here and there, especially on Ezio's face and the sky.
Then I signed it and called it a day! C:
I hope I didn't bore you too much! C:
Let me now if you have any questions! <:
Tumblr
As
More than a tutorial, I'd say it's a peek into how I paint… c:
Hope you enjoy it! <: (Download it for full size! C
Program used: Photoshop (but it's the same with every painting software, I guess…)
Brushes: chalk brush and oil brush
Layers: background, lineart (hidden and then deleted almost right away), Ezio, overlay for the adjustments.
STEP 1:
After filling the background with a light purple, I did a not-so-detailed lineart, then started painting on top of it with a chalk brush, just to block in the colours, especially in the face. Basically I started to get a feeling on where shadows and lights would fall.
STEP 2:
I started using the oil brush, which is the only brush I used till the end of the piece. As you may see, I started detailing Ezio's face a bit.
Note: I don't really start on the body until I don't get the face right… It's a quirk of mine, I guess… xD
STEP 3:
FLIPPING! I can't stress enough how important it is, to check the balance of the image and somehow highlight what you're doing wrong… C:
STEP 4:
now that I was kinda satisfied with the face, I moved on to the body.
Since I wanted to keep a rough feeling, I didn't detail this part too much; if I want to be really accurate, I usually do a proper lineart first, instead of starting with blotches of colours… C;
STEP 5:
more details on the clothes, especially his cape and shirt.
STEP 6/7:
flipping again! C: More attention on the hood and its folds, and on the torso. I guess it was at this point I noticed the proportion were quite off, so I had to resize his cape-covered shoulder and "stretch" his body (using the resize tool and the warp tool, the latter mainly to adjust shape and positions of the red stitches on the shirt).
STEP 8:
starting the background with blobs of colors just to get a felling on where buildings would be.
STEP 9:
more details on the background.
STEP 10:
blurred the bg using the "movement blur" C:
STEP 11:
after rotating the bg a bit, because it wasn't in the right perspective, I created a new layer set on "overlay" and adjusted the colours here and there, especially on Ezio's face and the sky.
Then I signed it and called it a day! C:
I hope I didn't bore you too much! C:
Let me now if you have any questions! <:
Tumblr
Image size
1496x12992px 6.88 MB
© 2012 - 2024 WisesnailArt
Comments34
Join the community to add your comment. Already a deviant? Log In
THANK YOU VERY MUCH! This is SO helpful! Your art is awesome! 