ShopDreamUp AI ArtDreamUp


Suggested Deviants


Suggested Collections


Description
Text only version of my Adobe Photoshop Tutorial: 3D Anaglyphs from a Depth Map. Please use this version for language translation.
For the full tutorial, go to [link]. Tutorial by Justin Manteuffel, ©2010.
goldΩmega
Tutorials
Adobe Photoshop Tutorial
3D Anaglyphs from a Depth Map
1-10-10
Introduction
Stereoscopy is is any technique that creates the illusion of depth in an image. Though not a new idea, stereoscopy has recently seen a resurgence in the form of polarizing projection technologies in motion pictures.
Anaglyphs are a lower technology and lower cost way of making such a visual effect. Though some find the use of color 3D glasses unsettling, anaglyphs easily translate to screen displays and to print.
Traditionally, anaglyphs are made by taking photographs from two cameras side-by-side simultaneously and combining them using post processing techniques into a single stereoscopic image. In this tutorial, we'll be using Photoshop methods to separate the color channels of a source image and simulate a parallax effect that creates the illusion of depth using displacement.
Don't worry; it's simpler than it sounds.
Materials Needed
1 Pair of 3D Glasses (red/cyan)
-Can be found at party stores or various online retailers for dirt cheap.
-Can also be found packaged with most new 3D DVD or Blu-ray titles.
Adobe Photoshop 6.0 or later
-I'll be using Photoshop CS for this tutorial, but any version with the Displace filter will do.
1 Digital Photo/Scan with some detail and visual depth
-Color or monochrome images with good tonal range and details throughout work best.
-Images with bright red/cyan colors throughout can cause the effect to fail or behave unpredictably. Such photos can sometimes successfully be made into anaglyphs after converting to grayscale, but not always.
A Little Imagination and Patience
-Making the depth map requires you to think about shading a little differently than you might be used to. With practice and patience, you’ll find making depth maps is really the fun part of this technique.
[Image of 3D Glasses, Photoshop Logo, a Detailed Histogram and a wide angle photo of a tree stump and acorn]
The humble makings of a 3D Anaglyph.
Step 1: Creating the Depth Map
Open your source image, choose File>Open. Immediately save a copy to your storage device with a name like depthmap.psd. This file’s extension MUST be .psd for the effect to work later. Do not save over your source image. Choose File>Save As
Also, your image must be 8 bits per channel for the effect to work. If your photo is 16 bits per channel, convert it to 8 before beginning.
Choose Image>Mode>8 Bits/Channel
On a new layer or layer group above your background layer, start making a grayscale image that describes the depth of the different areas of your image.
Choose Layer>New>Layer...
The most distant parts your image like open sky should be shaded flat black (0% brightness). Closer background objects like clouds should be a slightly lighter value, maybe a very dark 5%. Continue blocking in lighter and lighter tones to image areas you want to appear closer.
The areas in your image you want to appear closest should be shaded at 50% gray. It’s important not to shade areas of your image lighter than this. Lighter values closer to white cause an inverse parallax effect that isn’t correctly perceived when you wear 3d glasses.
You can use any digital shading techniques you like. I find the linear gradient, brush, selection, smudge, dodge and burn tools to be the most useful. Though better edges can result in a more accurate look, feel free to be loose and fast with this part. As long as we see different levels of depth in the right areas, that’s usually all that’s needed to sell the effect. Try not to leave gaps that show parts of your original in the finished depth map.
Remember, using grayscale to describe depth is more important than whether or not the depth map 'looks nice'. Texture is less important than topology. If you can, try to keep your original background layer intact for reference.
When you're finished building your depth map, save and close.
Choose File>Save, then choose File>Close
[Gradient Image]
Shade using Brightness values from 0%to 50% only. Any Brightness values above 50% cause the effect to fail.
0% Brightness, (Flat Black) represents the background pixels that are furthest away. 50% Brightness (Gray) represents the closest foreground pixels.
[Image of the Photoshop Save Dialog. File is called depthmap.psd]
Not a very creative filename perhaps, but descriptive.
[Close up of the top of the stump. The acorn has been shaded gray.]
The closest areas of this photo are shaded 50% Gray with the Brush tool, starting with this acorn.
[Photoshop Screenshot with a portion of the image selected]
A selection and the Gradient Tool blocks in the receding tree trunk. The gradient stops are 48% brightness at top to 5% brightness at bottom.
[Image of tree with more well-defined edges and a Photoshop tool selected]
Use the Smudge, Dodge & Burn tools to mould edges and define contours.
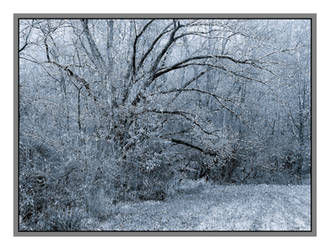
[Finished Depth Map]
The forest floor is at an angle in the photo, so the background layer of the depth map subtly gradates from flat black at top to 5% brightness at bottom. The acorn and surrounding forms are around 50% gray. As brightness increases, pixels will appear closer to the viewer. Note the slightly raises surfaces for leaves and such. This level of detail isn't essential, but can help sell the effect.
Step 2: Preparing the Source Image
Open your source image. Choose File>Open
Select the background layer in your Layers Palette and choose Layer>Duplicte Layer
Save this document on your storage device as something like anaglyph.psd. Choose File>Save As
With the top layer selected, choose Image>Adjustments>Channel Mixer
Select the Green output channel from the dropdown list and set the Green slider from 100% to 0%. Next, select the Blue output channel from the dropdown and set the Blue slider from 100% to 0%. This will be the red channel of your anaglyph. Click OK.
Select the bottom layer and choose Image>Adjustments>Channel Mixer
Set the red slider from 100% to 0%. This will be the cyan channel of your anaglyph. Click OK.
Lastly, select the red layer in your Layers Palette and set the blending mode to either Linear Dodge or Difference. Save this file: choose File>Save
[Screenshot of two Channel Mixer Dialogs]
Set the Green and Blue Channel Mixer settings for the top layer to 0%
[Screenshot of a Channel Mixer Dialog]
Set the Red Channel Mixer settings for the bottom layer to 0%
[Photoshop screenshot of working document and the Layer Palette. The blending mode (Linear Dodge) is circled in red]
At this point, you should have a red upper layer with the blending mode set to either Linear Dodge or Difference and a cyan background layer. The image itself looks correct due to the blending mode.
Step 3: Distort!
Select your red layer and choose Filter>Distort>Displace
Set the Horizontal Scale property to a negative number. The bigger the number, the greater the depth there will appear to be. Higher Resolution images require a greater amount of distortion. -10 should be sufficient for web resolution images. Click OK.
When prompted, find and select the depthmap.psd file we made in Step 1 and click Open.
Next, select your cyan layer and again choose Filter>Distort>Displace
Set the Horizontal Scale property to the inverse of the number you entered for the red channel. That is, if you set -10 for red, set +10 for cyan.
Click OK.
Again when prompted, select the same depthmap.psd file and click Open.
Your image is now a stereoscopic anaglyph!
[Displace dialog and Layers Palette. Red layer is selected]
Enter a negative value for your red layer.
[Displace dialog and Layers Palette. Cyan layer is selected.]
Enter a positive value for your cyan layer.
[Grey Image. Text says: Ladies and Gentlemen, Please put on your 3-D Glasses now.]
[Finished Anaglyph]
Whoa. That's deep.
Finishing Up
If your depth effect doesn't look right in places, don't save your anaglyph.psd file. Make changes to your depth map, revert your anaglyph.psd file and redo Step 3 until things are looking right. This may take a few tries, so be patient! If you find yourself making lots of changes to your depth map, consider making an action to help you automate Step 3.
Does your image not look right at all? Make sure you're wearing your 3D glasses properly. The red color should be over your left eye. Also check that you used negative values when distorting the red layer and positive values with the cyan layer.
Do you use 3D design programs like 3ds Max, Maya, Blender and so on? If you’d like to try this technique with your rendered images, most 3D applications have built-in ways of generating the depth map we made in Step 1. Check your Z-buffer render options or read your application’s documentation to learn how. For image sequences, these same compositing principles can be applied in Adobe After Effects to make stereoscopic video.
Though we used a photo in our example, this technique can be used with many different kinds of images. Try it with drawings or paintings too.
Credits
Many thanks to Sean Gleeson of Swell3D.com for the idea that spawned this tutorial. Visit Swell3d.com to learn more about all things anaglyphic.
Keep an eye out for my upcoming video tutorials on Photography at WonderWorldCity.com.
goldΩmega
Photography
www.goldomega.com
goldomega.deviantart.com
www.swell3d.com
For the full tutorial, go to [link]. Tutorial by Justin Manteuffel, ©2010.
goldΩmega
Tutorials
Adobe Photoshop Tutorial
3D Anaglyphs from a Depth Map
1-10-10
Introduction
Stereoscopy is is any technique that creates the illusion of depth in an image. Though not a new idea, stereoscopy has recently seen a resurgence in the form of polarizing projection technologies in motion pictures.
Anaglyphs are a lower technology and lower cost way of making such a visual effect. Though some find the use of color 3D glasses unsettling, anaglyphs easily translate to screen displays and to print.
Traditionally, anaglyphs are made by taking photographs from two cameras side-by-side simultaneously and combining them using post processing techniques into a single stereoscopic image. In this tutorial, we'll be using Photoshop methods to separate the color channels of a source image and simulate a parallax effect that creates the illusion of depth using displacement.
Don't worry; it's simpler than it sounds.
Materials Needed
1 Pair of 3D Glasses (red/cyan)
-Can be found at party stores or various online retailers for dirt cheap.
-Can also be found packaged with most new 3D DVD or Blu-ray titles.
Adobe Photoshop 6.0 or later
-I'll be using Photoshop CS for this tutorial, but any version with the Displace filter will do.
1 Digital Photo/Scan with some detail and visual depth
-Color or monochrome images with good tonal range and details throughout work best.
-Images with bright red/cyan colors throughout can cause the effect to fail or behave unpredictably. Such photos can sometimes successfully be made into anaglyphs after converting to grayscale, but not always.
A Little Imagination and Patience
-Making the depth map requires you to think about shading a little differently than you might be used to. With practice and patience, you’ll find making depth maps is really the fun part of this technique.
[Image of 3D Glasses, Photoshop Logo, a Detailed Histogram and a wide angle photo of a tree stump and acorn]
The humble makings of a 3D Anaglyph.
Step 1: Creating the Depth Map
Open your source image, choose File>Open. Immediately save a copy to your storage device with a name like depthmap.psd. This file’s extension MUST be .psd for the effect to work later. Do not save over your source image. Choose File>Save As
Also, your image must be 8 bits per channel for the effect to work. If your photo is 16 bits per channel, convert it to 8 before beginning.
Choose Image>Mode>8 Bits/Channel
On a new layer or layer group above your background layer, start making a grayscale image that describes the depth of the different areas of your image.
Choose Layer>New>Layer...
The most distant parts your image like open sky should be shaded flat black (0% brightness). Closer background objects like clouds should be a slightly lighter value, maybe a very dark 5%. Continue blocking in lighter and lighter tones to image areas you want to appear closer.
The areas in your image you want to appear closest should be shaded at 50% gray. It’s important not to shade areas of your image lighter than this. Lighter values closer to white cause an inverse parallax effect that isn’t correctly perceived when you wear 3d glasses.
You can use any digital shading techniques you like. I find the linear gradient, brush, selection, smudge, dodge and burn tools to be the most useful. Though better edges can result in a more accurate look, feel free to be loose and fast with this part. As long as we see different levels of depth in the right areas, that’s usually all that’s needed to sell the effect. Try not to leave gaps that show parts of your original in the finished depth map.
Remember, using grayscale to describe depth is more important than whether or not the depth map 'looks nice'. Texture is less important than topology. If you can, try to keep your original background layer intact for reference.
When you're finished building your depth map, save and close.
Choose File>Save, then choose File>Close
[Gradient Image]
Shade using Brightness values from 0%to 50% only. Any Brightness values above 50% cause the effect to fail.
0% Brightness, (Flat Black) represents the background pixels that are furthest away. 50% Brightness (Gray) represents the closest foreground pixels.
[Image of the Photoshop Save Dialog. File is called depthmap.psd]
Not a very creative filename perhaps, but descriptive.
[Close up of the top of the stump. The acorn has been shaded gray.]
The closest areas of this photo are shaded 50% Gray with the Brush tool, starting with this acorn.
[Photoshop Screenshot with a portion of the image selected]
A selection and the Gradient Tool blocks in the receding tree trunk. The gradient stops are 48% brightness at top to 5% brightness at bottom.
[Image of tree with more well-defined edges and a Photoshop tool selected]
Use the Smudge, Dodge & Burn tools to mould edges and define contours.
[Finished Depth Map]
The forest floor is at an angle in the photo, so the background layer of the depth map subtly gradates from flat black at top to 5% brightness at bottom. The acorn and surrounding forms are around 50% gray. As brightness increases, pixels will appear closer to the viewer. Note the slightly raises surfaces for leaves and such. This level of detail isn't essential, but can help sell the effect.
Step 2: Preparing the Source Image
Open your source image. Choose File>Open
Select the background layer in your Layers Palette and choose Layer>Duplicte Layer
Save this document on your storage device as something like anaglyph.psd. Choose File>Save As
With the top layer selected, choose Image>Adjustments>Channel Mixer
Select the Green output channel from the dropdown list and set the Green slider from 100% to 0%. Next, select the Blue output channel from the dropdown and set the Blue slider from 100% to 0%. This will be the red channel of your anaglyph. Click OK.
Select the bottom layer and choose Image>Adjustments>Channel Mixer
Set the red slider from 100% to 0%. This will be the cyan channel of your anaglyph. Click OK.
Lastly, select the red layer in your Layers Palette and set the blending mode to either Linear Dodge or Difference. Save this file: choose File>Save
[Screenshot of two Channel Mixer Dialogs]
Set the Green and Blue Channel Mixer settings for the top layer to 0%
[Screenshot of a Channel Mixer Dialog]
Set the Red Channel Mixer settings for the bottom layer to 0%
[Photoshop screenshot of working document and the Layer Palette. The blending mode (Linear Dodge) is circled in red]
At this point, you should have a red upper layer with the blending mode set to either Linear Dodge or Difference and a cyan background layer. The image itself looks correct due to the blending mode.
Step 3: Distort!
Select your red layer and choose Filter>Distort>Displace
Set the Horizontal Scale property to a negative number. The bigger the number, the greater the depth there will appear to be. Higher Resolution images require a greater amount of distortion. -10 should be sufficient for web resolution images. Click OK.
When prompted, find and select the depthmap.psd file we made in Step 1 and click Open.
Next, select your cyan layer and again choose Filter>Distort>Displace
Set the Horizontal Scale property to the inverse of the number you entered for the red channel. That is, if you set -10 for red, set +10 for cyan.
Click OK.
Again when prompted, select the same depthmap.psd file and click Open.
Your image is now a stereoscopic anaglyph!
[Displace dialog and Layers Palette. Red layer is selected]
Enter a negative value for your red layer.
[Displace dialog and Layers Palette. Cyan layer is selected.]
Enter a positive value for your cyan layer.
[Grey Image. Text says: Ladies and Gentlemen, Please put on your 3-D Glasses now.]
[Finished Anaglyph]
Whoa. That's deep.
Finishing Up
If your depth effect doesn't look right in places, don't save your anaglyph.psd file. Make changes to your depth map, revert your anaglyph.psd file and redo Step 3 until things are looking right. This may take a few tries, so be patient! If you find yourself making lots of changes to your depth map, consider making an action to help you automate Step 3.
Does your image not look right at all? Make sure you're wearing your 3D glasses properly. The red color should be over your left eye. Also check that you used negative values when distorting the red layer and positive values with the cyan layer.
Do you use 3D design programs like 3ds Max, Maya, Blender and so on? If you’d like to try this technique with your rendered images, most 3D applications have built-in ways of generating the depth map we made in Step 1. Check your Z-buffer render options or read your application’s documentation to learn how. For image sequences, these same compositing principles can be applied in Adobe After Effects to make stereoscopic video.
Though we used a photo in our example, this technique can be used with many different kinds of images. Try it with drawings or paintings too.
Credits
Many thanks to Sean Gleeson of Swell3D.com for the idea that spawned this tutorial. Visit Swell3d.com to learn more about all things anaglyphic.
Keep an eye out for my upcoming video tutorials on Photography at WonderWorldCity.com.
goldΩmega
Photography
www.goldomega.com
goldomega.deviantart.com
www.swell3d.com
Comments0
Join the community to add your comment. Already a deviant? Log In