I've for a long time wanted to make some sort of tutorial so I thought this was the perfect moment!
Just one note, english is my second language, so sorry for any weird sentences and also I don't claim this is the best or right way to do it, this is just how I did it
I made this fish for the opera La Boheme when I had an internship at an opera. It was supposed to look like a sturgeon (they are really big!) and seem to be frozen stiff.
I don't know what kind of styrofoam there is in other countries but I used the swedish pink kind that is pretty dense. All types of styrofoam has both pros and cons and to find out what you like to work with you will just have to try them out.

The set designer at the opera wanted the fish to be sort of as big as the roll of fake grass that you can see in the upper left corner. I cut out one like that in styrofoam, realised that it felt too small and that they probably wanted it bigger, and made a new one.

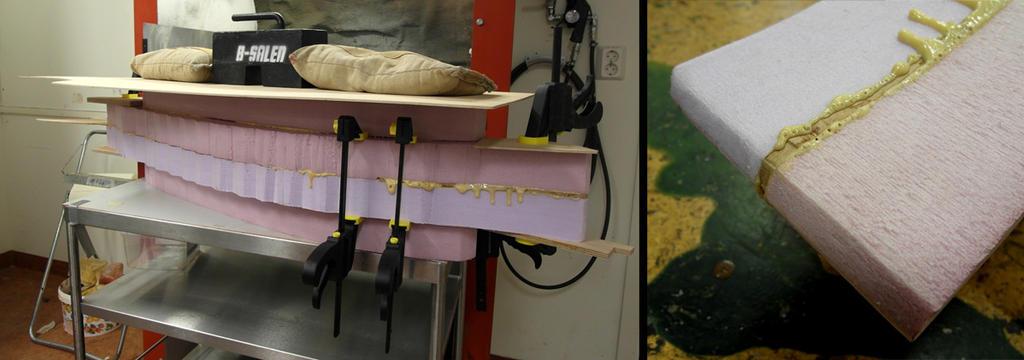
I don't have a good picture of it, but in the centre I added some wooden boards (maybe 5-10mm thick) to make it durable. You can see the "holes" (in lack of a better word) in the picture above, that I made at the head and the tail fin, to make it fit correctly. Now, if I made anything like this again, I would put some sort of reinforcement going through the whole body of the fish, instead of just the head and tail. Whyy, you ask! I will tell you, beacause not long before the opera premiered (when I had left, so it wasn't me

In the middle of the fish's body I put in some weights to make it feel a bit more realistic to the actors. I made a hole (a long one along the whole body making the weight even) and put in this string thing with weights inside ("blyband" in swedish, anyone want to translate?

I then glued the four styrofoam parts together with polyurethane glue. Make sure there is pressure on it since the glue will expand. It's a good choice of glue because it behaves alot like styrofoam when hardened and it's easy to carve the access off, it's also completely water resistant.
On the picture to the right you can see the wooden board reinforcement I put between the styrofoam blocks.

I then started to carve out the basic form of the fish using several reference pictures to see what shape the fish has from different angles. I did not follow the reference pictures completely, because they all looked a bit different and because of the size of the fish it started to look too much like a dolphin ^^
Use whatever tools that work for you, for example long knife blades (like those snap-off knife blades), fillet knife, saw, wood rasper, wire brush and so on, to get the shape like you want it. You can also use a heated wire to cut styrofoam but you need ventilation and stuff for that because it will create toxic fumes. (I've never tried that.)
Warning: using a wire brush too much will make your life a styrofoam hell! ;D With that I mean, it gets everywhere, you'll even find it inside your undies at the end of the day. Be in an area that is easily cleaned. Pressured air is nice to blow the stuff off your clothes. You could install a vacuum cleaner right next to your work space that will collect all the little styrofoam babies before they get everywhere. Or just live with it and deal with it xD

When I was happy with the body of the sturgeon I added the smaller fins, just made cuts into the styrofoam and sticked in and glued down bits of air-x with wood glue (small wooden board bits or anything like it would also work just fine, instead of air-x, see the upper right picture).
I added some more detail to the fish, like all the little dots and bumps on the sides, using bits of fabrics dipped in wood glue.

I used filler on the face of the fish because I thought it was a bit too rough and bumpy. I added more details to the face with gluey fabric bits (sort of sculping/building texture with it), and made holes for the eyes and nostrils. Also added those weird stringy things above the mouth
I covered the entire fish with a layer of fabric drenched in wood glue, making sure the fabric bits all overlapped. If I remember it correctly I covered it with a second layer also. Not sure what this is called in english but in swedish it is "kaschera". The wood glue can be mixed with a bit of water to make it easier to work with. The wood glue and fabric (and filler if you like, and more glue!) will make the styrofoam piece really durable.
I covered the fins with more fabric dipped in glue and folded it to look a bit like wrinkly frozen fins, sticking to the body of the fish.

When it was all covered and dried I sanded off rough edges to make it a bit smoother. Then I covered it with even more wood glue, at least one layer, but probably several layers. This will take a looong time to dry so make sure you have something else to do while waiting

I then wanted a texture to the fish. Sturgeons actually don't have scales but since this was going to be on a stage (an opera stage with an orchestra between the stage and audience) I wanted it to have some sort of texture that could be noticed so far away, so that it would not look too flat.
I did some experiments and tried lots of different ways to give the fish texture that could be seen several meters away, catching shadows or reflecting the light. Above are just a few things I tried. I ended up using some sort of "paper net" thing that is used in the ventilation system in for example a spray booth. Not sure how to explain this, I don't even exactly know what it is!

I did a test with painting a bit of styrofoam and glueing the netting stuff on, seen to the left. I liked it and sprayed lots more of the netting with different shades of silver and black spraypaint. Also, the netting came in different sizes, which was perfect, so I had the big net for the big body parts and netting with smaller holes for smaller parts.

I painted the fish using Rosco paints. I gave it a grey sort of colour and then some patchy thin layers of a warmer brown, and the stomach off white-ish. I made it a bit rough, looking a bit torn like the frozen fish had been a bit handled. I did a lot of painting the darker paint over the lighter ones and drying some off with a paper cloth (whatever that technique is called?) to give it some nice depth and look kinda fishy, particularly on the big parts of the body and the stomach where there would not be any scales. Also a bit of random scrubbing to make it look a bit more battered.
Those little things was probably never seen by anyone in the audience, but I wanted to make it look nice close up too (then the actors can enjoy it too
But in general when working in a place like that you don't really have time to go into a lot of details. And you have to always step back (way back, about where the audience will be) and look at your work and probably realise you have to exaggerate things even more to make it look good from far away. If possible, go to the stage where it will be used and look at it there from the audiences perspective.

I made some eyes by painting a couple of wooden buttons that I glued to the fish. I later put lots of wood glue on the eyes to make them look more cloudy and dead.

I then added the scales/net! I just glued it on, using more wood glue (wood glue is the best!) and making it a bit patchy, making the "scales" stand up in some places and lie flat on others. I used the smaller net on the face and tail fin and left a big part of the face without any scales.
When it had dried I put on more layers of wood glue, to sort of fill up the little spaces between the scales, here and there.

From the beginning the idea was that the actors would hold the fish in the tail fin and have the "nose" on the floor, but then they changed their minds and wanted to be able to put the fish with the tail fin down on the floor. So to make it more durable for handling like that, I put in some extra reinforcements in the fin, two metal sticks that I bent in the right shape and glued in there, patching it up as you can see in the picture to the right.

Now the fish was almost done, I just needed to make it look frosty and frozen! I used some cotton-wool that I glued on with wood glue (seen to the very left). I also put on patches with wood glue mixed with a sort of sand/glitter stuff I found. I used this wood glue-sand-glitter-mixture on spots here and there, sort of filling up the spaces between the scales, to look like frost.
I also added small glass bits on the bigger icy parts and silver glitter to make the fish sparkle in the stage light like frost and ice does. It was all covered with more wood glue sort of everywhere, especially on the little glass bits to make them sort of covered in glue so that no sharp edges would stick out. I did some sanding also with sand paper on any sharp things that could otherwise hurt the actors hands when handling the fish.

Then I guess I was pretty much done! And this was the end result.

Some closeups.

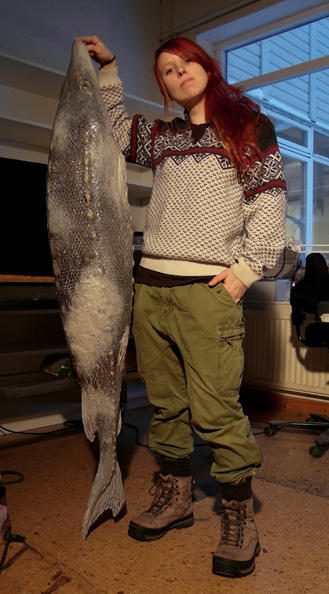
That's how big it is! Okay, I'm not very tall either but... myes. 160cm.
I hope that this tutorial was of some help or interest! Feel free to comment and ask any questions you may have ^^
Happy happy joy joy to everyone!
Nymla


