


The absolute number one cause of rejection of DD suggestions for most Artisan Craft CVs is poor photography. There is nothing worse than seeing an otherwise brilliant piece ruined by a dodgy photo. But even beyond DD acceptance, if you want to people on dA to be able to appreciate your skill you need to be able to show your work off to advantage.
Sometimes I'll tell a self-suggester that I can't feature their work because of the quality of the photography and they'll inevitably reply, "Oh, I'll have to get a better camera."
Sometimes I'll tell a self-suggester that I can't feature their work because of the quality of the photography and they'll inevitably reply, "Oh, I'll have to get a better camera."

Repeat after me: the tools never make the artist.
You don't need a $9000 sewing machine to stitch a dress, you don't need a $1000 stand mixer to bake a cake, and you similarly don't need a top of the range SLR to take a brilliant photograph. It's all in how you take the photo.
To help us understand photography concepts a little more, Fella is going to help us out. Say hi Fella!


The photograph on the left was taken using a cheap mobile phone camera. The one on the right was taken with a $1000 dSLR. Which photograph shows Fella more accurately and more clearly?
By understanding photography basics you can improve your photographs without spending a cent. Let's begin!
To help us understand photography concepts a little more, Fella is going to help us out. Say hi Fella!
The photograph on the left was taken using a cheap mobile phone camera. The one on the right was taken with a $1000 dSLR. Which photograph shows Fella more accurately and more clearly?
By understanding photography basics you can improve your photographs without spending a cent. Let's begin!
*** Disclaimer: I'm not a photographer or even a very good hobbyist photographer. These are basic, basic tips and tricks to yield decent photographs, not a still life photography tute. As an aside, all the photos from here on in are taken using my entry-level dSLR (a Canon EOS 600D) with a standard kit lens. All the following photos were taken using the same settings on my camera, so all the changes you see in the photographs are extrinsic to the camera itself. I'm embedding the photos here as thumbs, but to get a better look at the examples you can click on them to enlarge them.
1. Lighting
The single most important part of taking a photograph is the lighting. Good lighting will bring out the best of your craft.
Sourcing the right light
The worst pictures are often those taken under artificial house lights. You can see in the photo above how my kitchen light throws Fellas colours right off. A skilled photographer can deal with it, but don't make life hard for yourself. Take the photographs during the day under natural light. For those dealing with perishable items (e.g. culinary artists) this can be more challenging and will require work-arounds sometimes, but where time is not an issue take the time to do it right.
One way to do this is by taking your craft outside. But be mindful of what the great big light source in the sky is doing. In the middle of the day, especially in a sunny country such as my own, the sunlight might be too harsh. Here on the left you can see how over-exposed the photograph is. Some parts of Fella are far too bright, while others have deep shadows that obscure his features. Even Tobias knows it's far too bright to see anything clearly.


The photograph on the right was taken about 4 hours later, in the late afternoon. Fella is still in full sun, but the angle of the sun is much less direct, producing a softer light. The same thing will happen if it's an overcast day or if you can wait for the sun to pop behind a cloud - the light will diffuse and result in a much better snap. If you want to spend some dosh, you can buy or DIY yourself a light diffuser.
One way to do this is by taking your craft outside. But be mindful of what the great big light source in the sky is doing. In the middle of the day, especially in a sunny country such as my own, the sunlight might be too harsh. Here on the left you can see how over-exposed the photograph is. Some parts of Fella are far too bright, while others have deep shadows that obscure his features. Even Tobias knows it's far too bright to see anything clearly.
The photograph on the right was taken about 4 hours later, in the late afternoon. Fella is still in full sun, but the angle of the sun is much less direct, producing a softer light. The same thing will happen if it's an overcast day or if you can wait for the sun to pop behind a cloud - the light will diffuse and result in a much better snap. If you want to spend some dosh, you can buy or DIY yourself a light diffuser.
Bouncing light
Another way of using sunlight to your advantage is by using the largest accessible window in your house. A north-facing window is ideal, but any will really do as long as the sun isn't directly shining on the window. Unlike outside, the light will usually only be coming from one direction, but you can completely light all sides of your craft by bouncing the light around a little bit.
First, if your craft is backlit then all the light is coming from behind your craft and the front is too dark. We need to bounce the light from behind Fella onto his front. There's lots of fancy ways of doing this, but I'm broke and stingy so I rig this up with a couple of dollars worth of items. I use a large piece of white cardstock on one side to bounce back a soft dose of light onto Fella. On the other side I use a cake board as a makeshift reflector. This, being more reflective, bounces back a much stronger light. I angle this to bring light to the other side of Fella and get rid of and remaining shadows.

See what fella looks like with and without the reflectors:


But lets say you'd rather your craft is photographed with a plain background behind it. Then all your light is going to be coming from a different angle. I set this up so all the light is coming from one side, then use the same things to bounce the light onto the other side of him. The white cardstock projects a soft light onto the adjacent side of fella, then the cake board again is directed to whatever angle gets rid of those final shadows.

First, if your craft is backlit then all the light is coming from behind your craft and the front is too dark. We need to bounce the light from behind Fella onto his front. There's lots of fancy ways of doing this, but I'm broke and stingy so I rig this up with a couple of dollars worth of items. I use a large piece of white cardstock on one side to bounce back a soft dose of light onto Fella. On the other side I use a cake board as a makeshift reflector. This, being more reflective, bounces back a much stronger light. I angle this to bring light to the other side of Fella and get rid of and remaining shadows.
See what fella looks like with and without the reflectors:
But lets say you'd rather your craft is photographed with a plain background behind it. Then all your light is going to be coming from a different angle. I set this up so all the light is coming from one side, then use the same things to bounce the light onto the other side of him. The white cardstock projects a soft light onto the adjacent side of fella, then the cake board again is directed to whatever angle gets rid of those final shadows.
Again, see what fella looks like with and without the reflected light.


Flash
Don't ever use it. There's ways of bouncing the light and combining it with other light sources to effectively light a subject with a flash, but unless you know what you're doing never turn it on. You end up with a harshly lit subject and skewed colours. Ew:
The exposure triangle
This is more advanced than most will care for, but it can help to understand the exposure triangle. Even when I had point and shoot camera, I still used it on manual mode. Getting the right balance here will help you get the best photographs your camera is able to.
- Aperture: This setting, seen as the f-stop or f-number, controls how much light your camera lets in and what the depth of focus is. You'll see this on your camera as f[#]. What values you have will depend on your camera (or your lenses) but typically you'll see it ranged from f1.4 to f22. I like to leave this at the largest opening (smallest number) possible. This lets the most light in and creates a blur outside of your focal point (good for when you want the subject to stand out and the background to be blurry).
- ISO: You know when a photo shot in low light comes out all grainy? That's up to this guy. Your ISO setting controls how sensitive the sensor is to light. The less light you have, the higher the ISO needs to be. To avoid grainy/noisy images, it's best to have this value as low as your camera goes (I always set mine to 100).
- Shutter Speed: As the name suggests, this controls how long your shutter is open for. As we're shooting stationary objects, your subject won't dictate what your shutter speed needs to be. I like to set my aperture as wide as I can, my ISO as low as I can, then simply set the shutter speed to how ever long it needs to be to produce a properly exposed shot.
2. Focus
This seems obvious, but we see a lot of photographs of blurry crafts. How disappointing is it when you see the thumbnail of what looks like a stunning craft and open it only to see all the detail is lost in an out-of-focus snap? When you're showing off your craft, you want people to be able to see every speck of the detail you've taken the time to put into your craft, and we want to see it too!
Getting your craft in focus
One of the most common causes of blurred photos are people who've tried to get too close to their craft. All cameras have a limit as to how close you can get before it just won't focus. You need to know your camera's limits and don't try to push them.
For tiny crafts, turning on your macro setting will help. Ever seen this icon ( ) on your camera and not known what it meant? That's your macro setting, and is great for little crafts. On other cameras, you might have a 'TEXT' scene setting that will achieve the same effect. Most point-and-shoot cameras are actually better at this than SLRs, which need very specific lenses for macro shots.
If you just can't get close enough to snap the detail you want, then take the picture from a distance. You might be able to stand back and zoom in, which usually has a better chance of focusing properly. Otherwise take it at a distance then crop out the parts of the photo you don't want. The photo on the left was taken at a distance closer than what my camera was able to focus at. The middle one was achieved by standing back and zooming in. The one on the right was cropped from one of the above photos of Fella. Only in the last two can you see the detail of the stitching.
For tiny crafts, turning on your macro setting will help. Ever seen this icon (
If you just can't get close enough to snap the detail you want, then take the picture from a distance. You might be able to stand back and zoom in, which usually has a better chance of focusing properly. Otherwise take it at a distance then crop out the parts of the photo you don't want. The photo on the left was taken at a distance closer than what my camera was able to focus at. The middle one was achieved by standing back and zooming in. The one on the right was cropped from one of the above photos of Fella. Only in the last two can you see the detail of the stitching.
Camera shake
Shaky hands, or a lengthy exposure? This can cause blurring in your image regardless of how perfectly in focus it is. I refused to use a tripod for the longest time, but believe me, it's a life saver. I never take a photograph of my work without one now. I picked up a really cheap one from an op-shop. You can also get tiny tripods that are just meant to sit on a table that cost a few dollars. But you can also just prop the camera on a table or chair or anything else you can fashion at home to stop it from moving.
Another way to help get rid of shake when using a tripod or similar is to use the timer setting on your camera. Sometimes the mere act of pressing the shutter button can cause camera shake, so by using a 2 second delay, for example, the camera will be completely still when the shutter opens. (You can also buy remotes for same cameras that will set off the shutter without having to touch it, but lets not get too fancy).
Another way to help get rid of shake when using a tripod or similar is to use the timer setting on your camera. Sometimes the mere act of pressing the shutter button can cause camera shake, so by using a 2 second delay, for example, the camera will be completely still when the shutter opens. (You can also buy remotes for same cameras that will set off the shutter without having to touch it, but lets not get too fancy).
Focal point
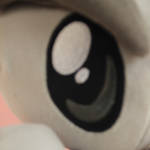
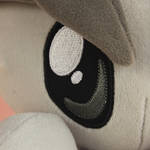
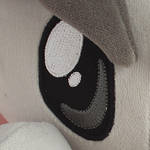
Be mindful of the focal point when taking photographs. If you're shooting at a wide aperture (i.e. a setting which creates a lot of blur outside of the focal point) this is especially important. If you have a live mode on your camera, or even if you're looking through a viewfinder, think about what part of the craft your eye goes to first and make sure that part is in focus. Is there a piece of garnish adorning a bowl of food? You're gonna look there first. Is it a plushie or a doll? Make sure the eyes and the face is in focus.
In the first photo Fella's face is in focus, but in the second it's his foot. Notice how in the second it makes the whole photo look blurry? But in the first you barely notice his foot is blurred. We're primates, we focus on faces.


In the first photo Fella's face is in focus, but in the second it's his foot. Notice how in the second it makes the whole photo look blurry? But in the first you barely notice his foot is blurred. We're primates, we focus on faces.
Any craft will have something that draws your eye first - find it and make sure it's in focus.
3. Setting
When you're taking a photograph of your craft, be mindful of where you're placing it. If it's on a cluttered table, the background is going to distract from your craft and make it harder to see the details. Photographing your craft against a clutter-free, or preferably plain, background will allow all the focus to go to your craft. The doesn't necessarily mean your craft has to be lonesome! Props can be used to effect, but only place them if they enhance your photo, not detract from it.

Messy background, yellow-y light and slightly out of focus - we see a lot of greats crafts with photos that look like the above. It's barely feature-able, and certainly nowhere near DD standard. Your beautiful crafts deserve better!
Messy background, yellow-y light and slightly out of focus - we see a lot of greats crafts with photos that look like the above. It's barely feature-able, and certainly nowhere near DD standard. Your beautiful crafts deserve better!
4. Perspective
Last but not least is perspective. This one should be obvious, but you would be amazed how many crafts we see taken from the most unflattering angles. Take photos from a range of perspectives: try overhead, angle up, angled down. Look for what works for your craft and shows it off. Sometimes you won't know what this is until you actually get your photos onto your computer and look at them in full size, but having a basket to choose from never hurts. For every photo I post there's usually another 10 I've taken at different angles (and exposures and white balance and everything else) that no one will ever see.


Photography Tutorials
Hungry for more? Check out these tutorials and articles on how to photograph objects, create light boxes and even some on post-production!


Project Educate: Photographing Your Crafts...
Photographing crafts is not as daunting as it seems. For those of you out there with amazing creative streaks in you, it isn't actually that difficult to take it one step further and put the effort into snapping your wonderful creations. It just takes a little planning, a camera and some creativity.
The Don'ts...
Rule Number One
Never ever ever ever ever Photograph something on your bed. Ever. I mean it! Your bed is for sleeping, and er, other things. But definitely not for placing your well constructed craft item upon, pointing your camera at, and pressing the button.
You might think I'm stating the obvious but seriously, the amount of people who think they'll just pop their item on the bed and take a picture...is..well..I don't have the statistics but there are many of Us!
Rule Number Two
Stay away from your cluttered up shelves and bits and pieces. Put your craft i


Project Educate: 4 tips for great product photos!In a world where many products are easily accessible on the internet - yes, even those - we've nearly fallen victim to the images that are slightly better than the rest, that entice us in, that persuade us to buy, bid, eat, cook and whatever else. (You've seen my Nom Nom articles right?) So it's not unusual that an eye-catching image can make all the difference when it comes to selling your products, or your photography - or both.
Stand out
Strong, Clear photographs will not only help you stand out on a web-page, but also will help you get your blog out there, or get your deviantART profile a bit more notice. Having a good working environment is often better than having that top notch expensive camera. So don't worry too much about your equipment. Get to know your angles, backdrops, props and lighting and the rest should hopefully fall into place.
Edit
Editing is really easy and good
The Artists Toolbox: Photography StudiosHearing the word studio makes me think of expensive rooms with top of the range equipment, fantastic lighting and only professional awesome photographers inside of it. In reality however, you can create a Photography studio for just about any type of Photography and it doesn't have to cost very much.
The Macro Studio
Macro Photography can be undertaken pretty much anywhere, but sometimes you just want to shoot something in a neutral environment with a plain, unobtrusive backdrop. Many photographers shy away from doing this because they think it's too complicated - actually you would be doing yourself a favour if you did try it, it can really help improve your work.
For starters, you don't even have to have expensive flash. You could use any lamp that you can easily move around, to give a bit of light into your mini studio. You also need a couple of sheets of card or paper, and a cardboard box. The sizing is completely up to you and up to the size of the o