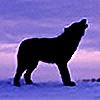

As I have mentioned before, these flowers are really tiny, so here's what the Sigma 70-300mm lens can do at 300mm with the Macro switch "on". To take this photo with the perspective I wanted, I had to lay the camera low on the ground, hence I flipped my LCD monitor while it was turned on for live view to make sure that everything was okay with my framing. I love this feature that most Canon cameras have: the articulating screen can be flipped and oriented to get a proper view of those shots that are hard to take because, for example, you need to lie down for long periods of time and would just be so much happier if you could avoid getting cold or dirty. So, a big YAY for articulating screens!
As I was recently asked how much post processing I do on my photos - and this varies, seriously, because it all depends on each single photo - I'd like to be more specific here, assuming that someone's may be interested, since Photoshop and alike software are such an important step of digital photography nowadays.
First of all, I opened the RAW file in Adobe Camera Raw and opted for some extra saturation after fixing the traces of burnt-out highlights. Once this was done and looked good, I went ahead and loaded my image in Photoshop CS5. Please note that I don't export, nor convert, nor save my RAW files into TIFF images or anything, I simply open them into PS as Smart Objects. I like doing this because in case there is something I don't like in my photos for whatever reason, I can go back to ACR and edit the RAW file settings as many times as I wish without compromising the image quality in the early stages of the post production.
Another trick I've learned is that huge files suck up all of my poor RAM and take ages to load after certain operations, so I duplicate and resize my image into something small - to help my compuer work faster - then do all of the post processing using layers, and finally transfer my custom groups of adjustment layers into the original file. I do this because doing all or almost all the editing on a large file and then resizing it into a smaller image will do far less damage to the image quality than working directly on a small, low resolution picture. For photographers like me that are obsessed with noise, this is very good.
So, once "These Wounds" was open in PS, I created several adjustment layers to: darken the image, increase the contrast, adjust the balance between contrast and brightness, selectively alter, saturate or desaturate certain colours that I wanted to edit, tweak the overall color balance to add more yellow. Finally, the image was cropped and I found a title for it.
Now it's time to resize it, and there are only three things I do after that in a separate .PSD file that is meant for web publishing: I merge and flatten my entire pile of layers, I execute the Auto Contrast command to see if PS can somewhat improve the final result by automatically adjusting the contrast - this doesn't always work, it usually does when I focus too much on the tones during the post processing and fail to notice that the photo I'm working on has lost a lot of contrast (I often under-contrast but never over-contrast, which is good). Alternatively, I apply a curve if the Auto Contrast turns out to be outstandingly ugly - and finally apply Sharpness through the Smart Sharpen and High Pass filters at variable opacity.
One last look at the histogram and done!
Thank you for reading,
Silvia