ShopDreamUp AI ArtDreamUp
Deviation Actions


Suggested Deviants


Suggested Collections


You Might Like…


![[Correction] for Janjanita](https://images-wixmp-ed30a86b8c4ca887773594c2.wixmp.com/f/060c5b2a-d29c-4413-a193-8ea0726072c5/d398kkp-bb4f2d26-f9a6-4f1b-b329-52689ccbe80e.jpg/v1/crop/w_184,h_184,x_0,y_150,scl_0.1869918699187,q_70,strp/_correction__for_janjanita_by_damaimikaz_d398kkp-92s-2x.jpg?token=eyJ0eXAiOiJKV1QiLCJhbGciOiJIUzI1NiJ9.eyJzdWIiOiJ1cm46YXBwOjdlMGQxODg5ODIyNjQzNzNhNWYwZDQxNWVhMGQyNmUwIiwiaXNzIjoidXJuOmFwcDo3ZTBkMTg4OTgyMjY0MzczYTVmMGQ0MTVlYTBkMjZlMCIsIm9iaiI6W1t7ImhlaWdodCI6Ijw9MzgyNyIsInBhdGgiOiJcL2ZcLzA2MGM1YjJhLWQyOWMtNDQxMy1hMTkzLThlYTA3MjYwNzJjNVwvZDM5OGtrcC1iYjRmMmQyNi1mOWE2LTRmMWItYjMyOS01MjY4OWNjYmU4MGUuanBnIiwid2lkdGgiOiI8PTkwMCJ9XV0sImF1ZCI6WyJ1cm46c2VydmljZTppbWFnZS5vcGVyYXRpb25zIl19.Q4C5PInI6XImgcAnIUdGRSRUYBobOSrQQn5-QDv7e3Q)
![[Correction] for Janjanita](https://images-wixmp-ed30a86b8c4ca887773594c2.wixmp.com/f/060c5b2a-d29c-4413-a193-8ea0726072c5/d398kkp-bb4f2d26-f9a6-4f1b-b329-52689ccbe80e.jpg/v1/crop/w_92,h_92,x_0,y_75,scl_0.09349593495935,q_70,strp/_correction__for_janjanita_by_damaimikaz_d398kkp-92s.jpg?token=eyJ0eXAiOiJKV1QiLCJhbGciOiJIUzI1NiJ9.eyJzdWIiOiJ1cm46YXBwOjdlMGQxODg5ODIyNjQzNzNhNWYwZDQxNWVhMGQyNmUwIiwiaXNzIjoidXJuOmFwcDo3ZTBkMTg4OTgyMjY0MzczYTVmMGQ0MTVlYTBkMjZlMCIsIm9iaiI6W1t7ImhlaWdodCI6Ijw9MzgyNyIsInBhdGgiOiJcL2ZcLzA2MGM1YjJhLWQyOWMtNDQxMy1hMTkzLThlYTA3MjYwNzJjNVwvZDM5OGtrcC1iYjRmMmQyNi1mOWE2LTRmMWItYjMyOS01MjY4OWNjYmU4MGUuanBnIiwid2lkdGgiOiI8PTkwMCJ9XV0sImF1ZCI6WyJ1cm46c2VydmljZTppbWFnZS5vcGVyYXRpb25zIl19.Q4C5PInI6XImgcAnIUdGRSRUYBobOSrQQn5-QDv7e3Q)


Featured in Groups


Description
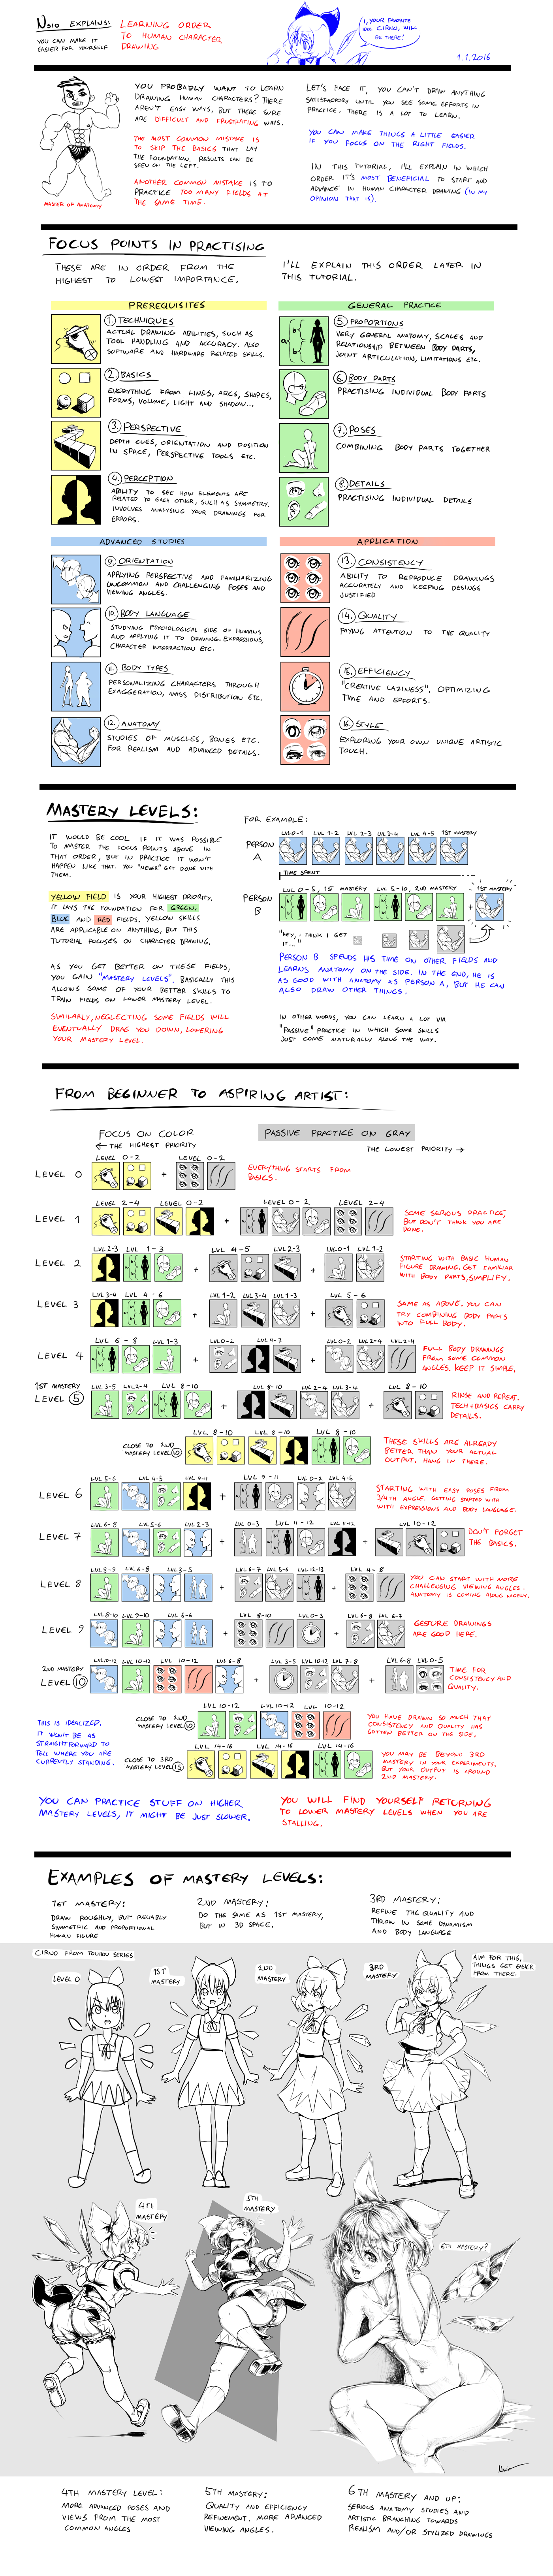
Happy new year! This is already 15th tutorial in my "Nsio explains" tutorial series. I've been thinking what would be the most efficient way to learn drawing human characters. I personally wanted to learn drawing quickly, so I put my focus on certain fields in order to do that. Inspired by my own improvements, I compiled this tutorial to shed some light how I did it (or how I would do it if I had to start from scratch).
This tutorial will be more on the explanation side rather than showing how to do anything. The fields I'm covering are so vast that it's not feasible to go in details in each of them. This might be helpful for you if you feel stalling.
I suppose that you want to learn drawing human figures, preferably sooner than later. I can understand the haste, but hold your horses. There are few things you need to practice before you can focus fully on figure drawing. There isn't exactly easy way, but you can make it really tedious, difficult and frustrating to yourself if you don't know what you are doing. The most common issue is that people skip the prerequisites, the general building blocks that form the solid foundation. Sure, perspective is hard and filling A4 papers with just circles is boring but it needs to be done.
Another thing causing problems is that people try to master too many fields at the same time. For example, you can forget coloring and shading if you are just getting used to pen or graphics tablet. The less focus points you have at time, the easier everything will be. And if you focus on them in right order, things will get even easier.
So, in this tutorial I will explain in which order I recommend practicing human figure drawing.
Focus points in practicing:
I'll list 16 focus points in four categories. There are many others, but I had to compress the list into elements that are most important. These go in order from most important (easiest to start) to less important (but essential once you get further in your studies). I'll explain why a bit later.
The Prerequisites (yellow blocks)
These has nothing to do with human figure drawing directly. These form the solid foundation for everything else, be it animals or vehicles.
1. Techniques - Involves raw drawing abilities. It all start from holding the tools correctly, accuracy and precision. Software, hardware and art medium specific skills are fit into this field as well.
2. Basics - BASICS! Everything essential you just have to know. Lines, arcs, shapes, forms, volume, light and shadow... you name it. You will use these to draw human figures later.
3. Perspective - Understanding the depth cues, orientation and position in space, perspective tools etc. are essential for successful human figure drawing. You can get fairly good at this in basic level if you just want to.
4. Perception - Training your artistic eye is critical part. You have to see the key features from the complex mess, such as symmetry. You will also be your own judge when analysing your drawings.
General Practice (green blocks)
These fields involve general human figure practice. With these focus points you can get to drawing and see results pretty quickly.
5. Proportions - Probably the most important thing after perspective and symmetry. Involves understanding scales and relations between objects (body parts), joint articulation, limitation, general anatomy etc.
6. Body Parts - Here you are getting to the point. I suggest starting with body parts that you will be drawing most often: face, head, bust, arms, hands, fingers, torso, legs, feet and finally toes.
7. Poses - In poses you combine the body parts and start with very basic poses and viewing angles. As you get better, you will start adding more poses to your repertoire.
8. Details - Similar to body parts, but here you focus on details that make humans distinctive, such as eyes, nose, mouth, ears, finger nails etc.
Advanced Studies (blue blocks)
You can practice these earlier, but you probably can't apply these until you get the other focus points covered. Also, this part can be tedious if you don't know how to go with it.
9. Orientation - Here you need that perspective understanding. You will be drawing body parts and full bodies from all manner of viewing angles so you have to know how to do it and how they will look.
10. Body Language - Psychological side of humans is even more important than your drawing skills. Involves body language, expressions, character interaction, status in society etc. These will make you characters alive. You can fit dynamism in this field.
11. Body Types - This involves studies on body variations. You don't want all you characters looking the same do you?
12. Anatomy - The nightmare. Studies about muscles, bones, skin etc. Anything that will contribute to the appearance of the characters. You can make this hard and tedious for yourself if you want.
Application (red blocks)
In theory, these can be learned anytime, but practically these will come into play when you are fairly good and want to make your works public.
13. Consistency - Ability to reproduce anything you have drawn before accurately and keeping your design justified.
14. Quality - Overall quality of your works. During practice, quality isn't that important, but once you start pumping finished drawing out, you will need to pay attention to this field.
15. Efficiency - Once you are getting good quality output, it's time to optimize everything. "Creative laziness" rules. You can possibly start skipping some phases in drawing process.
16. Style - Last but not the least, this field will govern your unique artistic touch. It's last because, once you get everything else in place, you can focus on just making art.
Mastery Levels:
The list above is the order I recommend going for. It would be neat if it was that straightforward, but in practice it doesn't happen that way. You never get done with one field to move to another. Also, it's difficult to isolate the fields. The four categories are fairly independent but still interconnected to each other. This is also why this order will work especially well and now I'l explain why.
You could say that each category form a foundation for the next. Yellow blocks are prerequisites, which form foundation for the rest. Thus, anything learned in these fields can be transferred to other categories (and other subjects as well, but let's focus on human figure drawing). You could also think like "red blocks won't do me any good until I get the blue blocks, and for that I need green blocks, which come after yellow blocks).
The interconnection between fields comes in effect once you are getting fairly good at preceding fields. You will find yourself learning some things exponentially faster even if you don't actively put efforts on them. That's because of "mastery levels" as I call them. As you get better, some of your skills are so good that they begin to carry lower level skills with them. That said, you probably don't need to pay attention to quality in first years, because by the time you need it, you have drawn so much that you can already draw in decent quality. There are multiple mastery levels for each field/category and the higher it is, the better you ultimately become.
Similarly, if you don't practice some fields enough (especially on the yellow blocks), your learning speed decreases substantially. You suddenly need to spend a lot of efforts in something and you don't get it in place in the end. You will stall. When this happens, it's always good idea to visit lower mastery levels and do some very basic studies and practice.
Imagine two person doing some practice. Person A chooses Advanced Studies: Anatomy, while B chooses General Practice: Proportions, Body Parts and Poses. Both spend the same time on studying and practicing. Person A has attained 1st mastery level in anatomy, while person B has 1st and maybe 2nd mastery level on his chosen fields. While person B was drawing human figure drawings, he might have figured out a thing or two about anatomy on the side and thus has 1st mastery level on anatomy as well. Unlike person B, who can already draw some human figures, person A can draw only some anatomy stuff. It's not that this is bad, it's just that person B might find her artistic journey much more entertaining, while for person A it's tedious anatomy studies over and over.
This is why I chose proportions over anatomy when I started drawing. I tried studying anatomy but I didn't understand it and thus couldn't apply it in my drawings. With proportions, I managed to get into drawing much faster and today I can draw quite decent looking human figures. I have done "passive" anatomy studies, which includes looking references mainly. I'm slowly adding more information in my visual library and thus I can focus more on the actual art making. In the end, anatomy isn't the most important thing when it comes to art.
From beginner to aspiring artist:
This part has an example of focus points for attaining 1st and 2nd mastery levels. I won't go this trough here, because the icons should be quite obvious. The colored blocks are focus points and gray blocks are learnt passively. There aren't any specific definitions for levels in between mastery levels, they are just towards steps towards them. It's also good to note that this is idealized learning process and it's not tied to any set time period. For someone it may take a month to get to 2nd mastery level and for another it takes a year. You may also get even higher mastery levels on individual fields, but basically the field with lowest mastery level defines your current standing. That's the output you can reliably get out.
Some things to bear in mind:
General Studies: Body Parts:
You can divide body parts into sub-mastery levels. For example, if you start with head and get it to 5th mastery level, all other body parts will most likely remain at 0 or 1st mastery level.
General Studies: Poses
Even though in theory the sub-mastery level of head body part is 5th, you can make things easier for yourself and draw it in lower mastery level. You are practicing poses, you don't need that extra bling-bling there.
Advanced Studies: Orientation
Your perspective skill should be greater than Orientation. However, you can practice Orientation together with Prerequisites: Basics as if it was on the yellow category. You can start drawing advanced poses with basic forms.
Remember, none of the fields are isolated. You can combine higher level fields with lower level fields and start practicing them already. You can also lower your mastery level in your practices to make them easier and more feasible. In gesture drawings, you don't need details nor quality for example.
Examples of mastery levels:
I have drawn Cirno from Touhou game series (by team Shanghai Alice/ZUN) as to demonstrate how mastery levels could look. Note that in first two mastery levels I had to artificially lower my mastery level and in last two examples I've tried to do my best. I'm lacking in some fields so I'm not reliably on the 6th mastery level. I'm currently focusing on 4th and 5th mastery levels in my pose practices.
Level 0: We all start from here, nothing to be ashamed of.
1st mastery: You won't do much at this level, but it's improvement nevertheless. Your main focus points are symmetry and proportions in some very basic views.
2nd mastery: This is pretty much the same as the 1st mastery, but here you start applying some perspective. It's quite a challenge to keep symmetric feel when the viewing angle changes.
3rd mastery: It's time to do some refinements and throw in some dynamism and body language. The difference in repertoire is still subtle but the difference is quite visible.
Comment: I tend to draw on this level a lot. It's the best for warming up.
4th mastery: Time to add more challenging poses and also drawing things from most common viewing angles.
5th mastery: More quality refinements and attention to efficiency. Poses and viewing angles get only more advanced. (It's good to either draw advanced poses+normal angles or common poses+advanced angles)
Comment: I'm surprised how well this turned out. I was afraid if I was too rusty to even try it, but doing the lower level (and sixth) examples were enough to get warmed up.
6th mastery and up: Anatomy studies begin to show fruition at this level. This is also where the artist can start branching towards realism or more stylized approach.
Comment: I'm quite happy about this as well. It was fun to draw with hatching techniques for a change. Semi-realism is still the closest I can get to realism without references.
That's about it. I hope you enjoyed this one. Until next time")
Nsio of the Hermit Mystics
This tutorial will be more on the explanation side rather than showing how to do anything. The fields I'm covering are so vast that it's not feasible to go in details in each of them. This might be helpful for you if you feel stalling.
I suppose that you want to learn drawing human figures, preferably sooner than later. I can understand the haste, but hold your horses. There are few things you need to practice before you can focus fully on figure drawing. There isn't exactly easy way, but you can make it really tedious, difficult and frustrating to yourself if you don't know what you are doing. The most common issue is that people skip the prerequisites, the general building blocks that form the solid foundation. Sure, perspective is hard and filling A4 papers with just circles is boring but it needs to be done.
Another thing causing problems is that people try to master too many fields at the same time. For example, you can forget coloring and shading if you are just getting used to pen or graphics tablet. The less focus points you have at time, the easier everything will be. And if you focus on them in right order, things will get even easier.
So, in this tutorial I will explain in which order I recommend practicing human figure drawing.
Focus points in practicing:
I'll list 16 focus points in four categories. There are many others, but I had to compress the list into elements that are most important. These go in order from most important (easiest to start) to less important (but essential once you get further in your studies). I'll explain why a bit later.
The Prerequisites (yellow blocks)
These has nothing to do with human figure drawing directly. These form the solid foundation for everything else, be it animals or vehicles.
1. Techniques - Involves raw drawing abilities. It all start from holding the tools correctly, accuracy and precision. Software, hardware and art medium specific skills are fit into this field as well.
2. Basics - BASICS! Everything essential you just have to know. Lines, arcs, shapes, forms, volume, light and shadow... you name it. You will use these to draw human figures later.
3. Perspective - Understanding the depth cues, orientation and position in space, perspective tools etc. are essential for successful human figure drawing. You can get fairly good at this in basic level if you just want to.
4. Perception - Training your artistic eye is critical part. You have to see the key features from the complex mess, such as symmetry. You will also be your own judge when analysing your drawings.
General Practice (green blocks)
These fields involve general human figure practice. With these focus points you can get to drawing and see results pretty quickly.
5. Proportions - Probably the most important thing after perspective and symmetry. Involves understanding scales and relations between objects (body parts), joint articulation, limitation, general anatomy etc.
6. Body Parts - Here you are getting to the point. I suggest starting with body parts that you will be drawing most often: face, head, bust, arms, hands, fingers, torso, legs, feet and finally toes.
7. Poses - In poses you combine the body parts and start with very basic poses and viewing angles. As you get better, you will start adding more poses to your repertoire.
8. Details - Similar to body parts, but here you focus on details that make humans distinctive, such as eyes, nose, mouth, ears, finger nails etc.
Advanced Studies (blue blocks)
You can practice these earlier, but you probably can't apply these until you get the other focus points covered. Also, this part can be tedious if you don't know how to go with it.
9. Orientation - Here you need that perspective understanding. You will be drawing body parts and full bodies from all manner of viewing angles so you have to know how to do it and how they will look.
10. Body Language - Psychological side of humans is even more important than your drawing skills. Involves body language, expressions, character interaction, status in society etc. These will make you characters alive. You can fit dynamism in this field.
11. Body Types - This involves studies on body variations. You don't want all you characters looking the same do you?
12. Anatomy - The nightmare. Studies about muscles, bones, skin etc. Anything that will contribute to the appearance of the characters. You can make this hard and tedious for yourself if you want.
Application (red blocks)
In theory, these can be learned anytime, but practically these will come into play when you are fairly good and want to make your works public.
13. Consistency - Ability to reproduce anything you have drawn before accurately and keeping your design justified.
14. Quality - Overall quality of your works. During practice, quality isn't that important, but once you start pumping finished drawing out, you will need to pay attention to this field.
15. Efficiency - Once you are getting good quality output, it's time to optimize everything. "Creative laziness" rules. You can possibly start skipping some phases in drawing process.
16. Style - Last but not the least, this field will govern your unique artistic touch. It's last because, once you get everything else in place, you can focus on just making art.
Mastery Levels:
The list above is the order I recommend going for. It would be neat if it was that straightforward, but in practice it doesn't happen that way. You never get done with one field to move to another. Also, it's difficult to isolate the fields. The four categories are fairly independent but still interconnected to each other. This is also why this order will work especially well and now I'l explain why.
You could say that each category form a foundation for the next. Yellow blocks are prerequisites, which form foundation for the rest. Thus, anything learned in these fields can be transferred to other categories (and other subjects as well, but let's focus on human figure drawing). You could also think like "red blocks won't do me any good until I get the blue blocks, and for that I need green blocks, which come after yellow blocks).
The interconnection between fields comes in effect once you are getting fairly good at preceding fields. You will find yourself learning some things exponentially faster even if you don't actively put efforts on them. That's because of "mastery levels" as I call them. As you get better, some of your skills are so good that they begin to carry lower level skills with them. That said, you probably don't need to pay attention to quality in first years, because by the time you need it, you have drawn so much that you can already draw in decent quality. There are multiple mastery levels for each field/category and the higher it is, the better you ultimately become.
Similarly, if you don't practice some fields enough (especially on the yellow blocks), your learning speed decreases substantially. You suddenly need to spend a lot of efforts in something and you don't get it in place in the end. You will stall. When this happens, it's always good idea to visit lower mastery levels and do some very basic studies and practice.
Imagine two person doing some practice. Person A chooses Advanced Studies: Anatomy, while B chooses General Practice: Proportions, Body Parts and Poses. Both spend the same time on studying and practicing. Person A has attained 1st mastery level in anatomy, while person B has 1st and maybe 2nd mastery level on his chosen fields. While person B was drawing human figure drawings, he might have figured out a thing or two about anatomy on the side and thus has 1st mastery level on anatomy as well. Unlike person B, who can already draw some human figures, person A can draw only some anatomy stuff. It's not that this is bad, it's just that person B might find her artistic journey much more entertaining, while for person A it's tedious anatomy studies over and over.
This is why I chose proportions over anatomy when I started drawing. I tried studying anatomy but I didn't understand it and thus couldn't apply it in my drawings. With proportions, I managed to get into drawing much faster and today I can draw quite decent looking human figures. I have done "passive" anatomy studies, which includes looking references mainly. I'm slowly adding more information in my visual library and thus I can focus more on the actual art making. In the end, anatomy isn't the most important thing when it comes to art.
From beginner to aspiring artist:
This part has an example of focus points for attaining 1st and 2nd mastery levels. I won't go this trough here, because the icons should be quite obvious. The colored blocks are focus points and gray blocks are learnt passively. There aren't any specific definitions for levels in between mastery levels, they are just towards steps towards them. It's also good to note that this is idealized learning process and it's not tied to any set time period. For someone it may take a month to get to 2nd mastery level and for another it takes a year. You may also get even higher mastery levels on individual fields, but basically the field with lowest mastery level defines your current standing. That's the output you can reliably get out.
Some things to bear in mind:
General Studies: Body Parts:
You can divide body parts into sub-mastery levels. For example, if you start with head and get it to 5th mastery level, all other body parts will most likely remain at 0 or 1st mastery level.
General Studies: Poses
Even though in theory the sub-mastery level of head body part is 5th, you can make things easier for yourself and draw it in lower mastery level. You are practicing poses, you don't need that extra bling-bling there.
Advanced Studies: Orientation
Your perspective skill should be greater than Orientation. However, you can practice Orientation together with Prerequisites: Basics as if it was on the yellow category. You can start drawing advanced poses with basic forms.
Remember, none of the fields are isolated. You can combine higher level fields with lower level fields and start practicing them already. You can also lower your mastery level in your practices to make them easier and more feasible. In gesture drawings, you don't need details nor quality for example.
Examples of mastery levels:
I have drawn Cirno from Touhou game series (by team Shanghai Alice/ZUN) as to demonstrate how mastery levels could look. Note that in first two mastery levels I had to artificially lower my mastery level and in last two examples I've tried to do my best. I'm lacking in some fields so I'm not reliably on the 6th mastery level. I'm currently focusing on 4th and 5th mastery levels in my pose practices.
Level 0: We all start from here, nothing to be ashamed of.
1st mastery: You won't do much at this level, but it's improvement nevertheless. Your main focus points are symmetry and proportions in some very basic views.
2nd mastery: This is pretty much the same as the 1st mastery, but here you start applying some perspective. It's quite a challenge to keep symmetric feel when the viewing angle changes.
3rd mastery: It's time to do some refinements and throw in some dynamism and body language. The difference in repertoire is still subtle but the difference is quite visible.
Comment: I tend to draw on this level a lot. It's the best for warming up.
4th mastery: Time to add more challenging poses and also drawing things from most common viewing angles.
5th mastery: More quality refinements and attention to efficiency. Poses and viewing angles get only more advanced. (It's good to either draw advanced poses+normal angles or common poses+advanced angles)
Comment: I'm surprised how well this turned out. I was afraid if I was too rusty to even try it, but doing the lower level (and sixth) examples were enough to get warmed up.
6th mastery and up: Anatomy studies begin to show fruition at this level. This is also where the artist can start branching towards realism or more stylized approach.
Comment: I'm quite happy about this as well. It was fun to draw with hatching techniques for a change. Semi-realism is still the closest I can get to realism without references.
That's about it. I hope you enjoyed this one. Until next time
Nsio of the Hermit Mystics
Image size
1400x6521px 2.92 MB
© 2016 - 2024 Nsio
Comments361
Join the community to add your comment. Already a deviant? Log In
Don't know if you will respond to this, but I'll give it a shot. Let's say I wanted to start from level 1, what would a day of practice look like?