ShopDreamUp AI ArtDreamUp
Deviation Actions


Suggested Deviants


Suggested Collections


Description
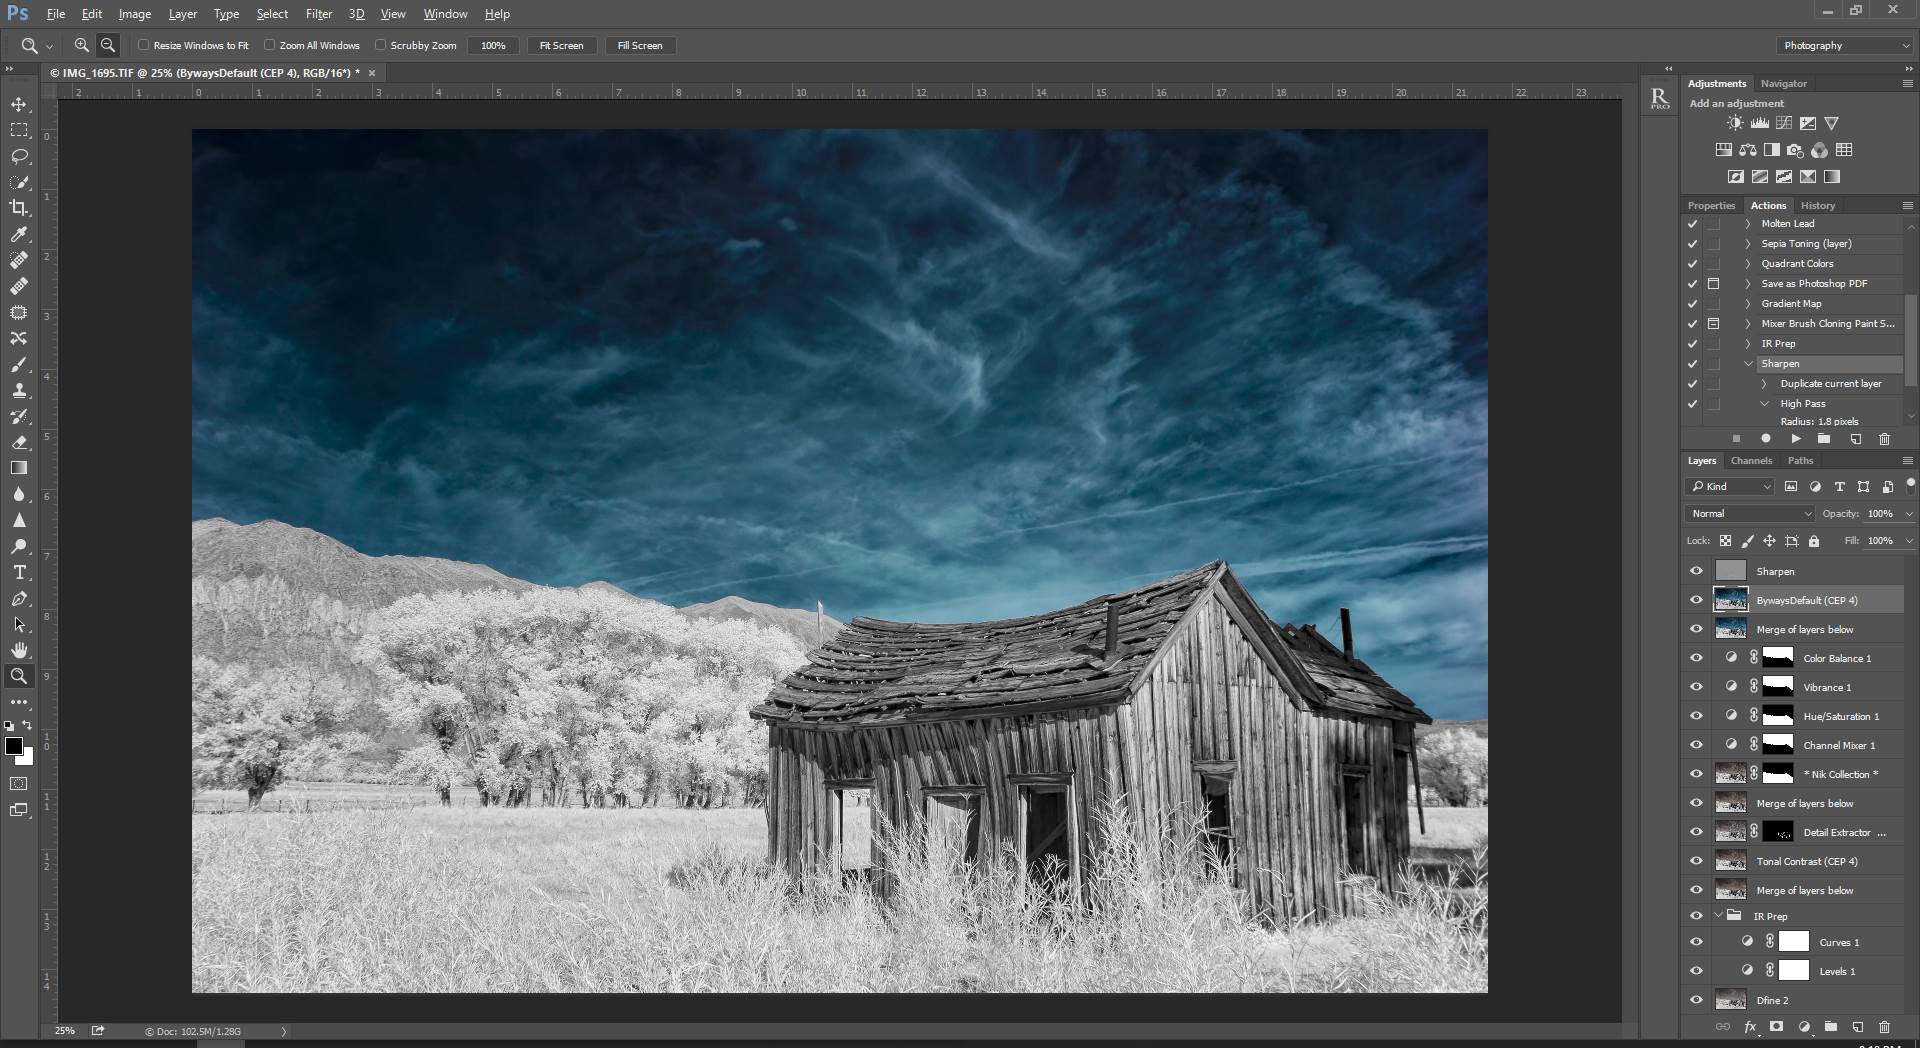
IR Processing Workflow for Pine Creek Cabin
That about sums up the process I took to develop this image. Of course if you have any questions you're welcome to either drop a comment below or send me a note! Happy editing!
Of course you can see the final HERE.
- In Lightroom apply Lens Profile Correction for Canon EF-S 10-22 mm
- Transfer to Photoshop
- Run image through Nik RAW Presharpener
- Use Nik Dfine 2 for noise reduction. At this point I remove the two previous layers and this layer becomes the new background upon which all future processing will be based.
- Execute Custom “IR Prep” action stack. Performs the following operations:
- Create a new layer group named “IR Prep” and adds the following adjustment layers to it:
- Add a Levels adjustment layer
- Add a Curves adjustment layer
- Add a Hue/Saturation adjustment layer with Master saturation set to -100
- Add a Channel Mixer adjustment layer Red/Blue channels swapped.
- At this point I toggle all the adjustment layers except the Channel Mixer layer. I do this to determine how much blue response I have in the sky. Since my camera is converted with an 830nm it doesn’t always get as good of a response as say a 720nm conversion would. In this case there was some promise so I continued editing. Also I should add that I ran these actions on this RAW file before selecting it for the contest for just this reason. I wanted everyone to have a sky they could do a Red/Blue channel swap at their option.
- Adjust levels per channel. Some would advise just setting a black and white point using the entire RGB spectrum, but I’ve come across cases where the camera will have wildly different bright and dark points on a per channel bases even with a 830nm conversion. You’re mileage may vary. In this case I used the following values (maximum no clip):
- R: 13, 246
- G: 13, 245
- B: 13, 245
- Set Curves to preset “Linear Contrast”. This is just to taste. I bounce between many of the presets for the Curves adjustment layer. In this case I was torn between “Linear Contrast” and “Medium Contrast”. I liked the tone of “Medium Contrast” but knowing I would be using Nik Color Efex later combined with how dark some of the darks were I went with “Linear Contrast” instead.
- While leaving the Channel Mixer and Hue/Saturation adjustment layers hidden I merge all visible layers to a new layer (Ctrl+Shift+E).
- Fire up Color Efex Pro using the newly merged layer. I apply Color Efex adjustments in separate layers. Some people may combine them all at once in Color Efex and then have them returned as a new layer in Photoshop. I prefer to keep them separate. Started with a Tonal Contrast adjustment.
- Color Efex Pro Detail Extractor layer to bring out details in the deepest shadows. Utilized a luminosity mask for the deepest darks.
- Another merge visible layer into new layer (Ctrl+Shift+E).
- Another Color Efex Pro Detail Extractor layer. Effect greatly reduced to serve more as a sharpening layer than anything. Side effect is it REALLY brightens clouds. I used the Quick Selection Tool to select the sky, feather the selection by 2px, invert, and create a new layer mask. This mask will prove useful later.
- Move my Channel Mixer and Hue/Saturation layers to top layers.
- While holding Ctrl+Alt+Shift drag the previous Detail Extractor layer mask to the Channel Mixer layer and make channel visible. This makes the channel swap apply to ONLY the sky. I check the areas along the edge for obvious trouble spots and correct as needed.
- Again, while holding Ctrl+Alt+Shift drag the previous Channel Mixer layer mask to the Hue/Saturation layer and make channel visible. This desaturates everything EXCEPT the sky. I check the areas along the edge for obvious trouble spots and correct as needed.
- Now I’m not happy with the sky. There is some response there but not quite enough. Time to boost it. I really pushed it to get to this level. Added a Vibrance adjustment layer and copied the layer mask (Drag while holding Ctrl+Alt) from the Channel Mixer adjustment layer with the following settings:
- Vibrance: +100
- Saturation: +30
- Getting closer. Sky looks too green. Added a Color Balance adjustment layer, applied the sky only mask, and used the following settings:
- Tone: Shadows, Blue +5
- Tone: Midtones, Blue +10
- Tone: Highlights, Blue +10
- Finally a sky I’m happy with. Another merge visible layer into new layer (Ctrl+Shift+E).
- Final trip to Color Efex to apply Darken/Lighten Center for a vignette.
- Apply custom “Sharpen” action. Duplicate layer, Filter -> Other -> High Pass, radius 1.8 px, Overlay blend mode.
- Merge visible and save. Returning to Lightroom.
- Minor Clarity and Vibrance adjustment.
- Export for your viewing pleasure!
That about sums up the process I took to develop this image. Of course if you have any questions you're welcome to either drop a comment below or send me a note! Happy editing!
Of course you can see the final HERE.
Image size
1920x1048px 253.5 KB
Comments3
Join the community to add your comment. Already a deviant? Log In
Great workflow!