ShopDreamUp AI ArtDreamUp
Deviation Actions

Read other parts:
- Part 1 - Basics
- Part 2 - Composition & Graphics
- Part 3 - Creating Panel Switchers
- Part 4 - Avoiding Truncated Panels
- Part 5 - Elements Relative Position and Size
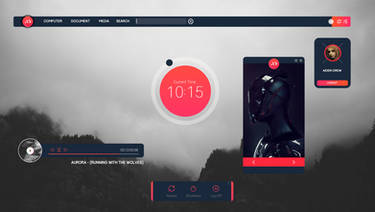
Elements Relative Position and Size

and goes up to 7 columns on 1920px x 1080px. Also the ELPlaylist (right panel) goes from 373px (1200px x 600x) to 493px (1920px x 1080px).
With this tutorial you can also use codes to distribute additional width and height of your current window size to your liking.
Components Required
Columns UI
Panels Stack Splitter
UI Hacks
1. First of all, install foobar on portable mode, select Columns UI when you open foobar2000.

Then go to preferences -> Display -> Main Window -> set minimum size to 500px x 500px (It's important to set the minimum size of the window) -> apply
Resize your current window size to 500px x 500px . You can also configure frame style from Main Window, I prefer to hide it (No Border).

2. Go to Preferences -> Display -> Columns UI-> Layout tab -> remove Vertical Splitter and NG Playlist then add Panel Stack Splitter. Click Apply

Remove all panels on top (Playback buttons, menu, etc) and bottom (status pane) so there's no panels left.

3. Let's start with creating 4 rectangles, Right-click on any area -> Splitter Settings -> Script tab -> copy-paste these codes:
$drawrect(0,0,250,250,255-0-0,)
$drawrect(250,0,250,250,0-255-0,)
$drawrect(0,250,250,250,0-0-255,)
$drawrect(250,250,250,250,200-200-200,)

With these codes, each rectangle has 250x width and 250px height, but if you stretch the window wider on higher, those rectangles didn't get additional width and height,
that's normal because they are on fixed size.
4. Delete codes in step 3 and replace it with these:
$drawrect(0,0,250,250,255-0-0,)
$drawrect(250,0,$sub(%_width%,250),250,0-255-0,)
$drawrect(0,250,250,$sub(%_height%,250),0-0-255,)
$drawrect(250,250,$sub(%_width%,250),$sub(%_height%,250),200-200-200,)
*%_width% and %_height% are variables to measure the width and height of foobar2000 window. Right now (on default size) it has value of 500.

With these codes, the green and grey rectangles gets wider if you widening the window, also the blue and grey rectangles gets more height if you drag the window higher,
but the red rectangle size remains the same.
5. The idea of this tutorial is that, when you drag the window wider and/or higher, you can distribute the additional width and height to your elements (at least 2 elements and e.g. rectangles on this tutorial)
Let's create 2 variables to measure the additional width and height of your window size, then divided them by two :
$puts(RelPos_X,$div($sub(%_width%,500),2))*RelPos stands for relative position
$puts(RelPos_Y,$div($sub(%_height%,500),2))
Delete codes in step 4 and replace it with these:
$drawrect(0,0,$add($get(RelPos_X),250),$add($get(RelPos_Y),250),255-0-0,)
$drawrect($add($get(RelPos_X),250),0,$add($get(RelPos_X),250),$add($get(RelPos_Y),250),0-255-0,)
$drawrect(0,$add($get(RelPos_Y),250),$add($get(RelPos_X),250),$add($get(RelPos_Y),250),0-0-255,)
$drawrect($add($get(RelPos_X),250),$add($get(RelPos_Y),250),$add($get(RelPos_X),250),$add($get(RelPos_Y),250),200-200-200,)

With these codes, ALL rectangles gets more width and height if you resize the window to a wider or higher size. RelPos (X & Y) measures additional width and height and distribute it to our rectangles.
On default size (500px x 500px), '$add($get(RelPos_X),250)'and '$add($get(RelPos_Y),250)' equals 250px, but when you resize your window, say 1000px x 1000px, those 2 variables has value of 500px (250 + width/height - 250 then divided by 2)
6. Now that you already distributed addditional width & height by two, you can for example, distribute it by six (1 element gets 5/6 of additional width or height and the other element gets 1/6).
Just add another two RelPos:
$puts(RelPos_X2,$div($sub(%_width%,500),6))
$puts(RelPos_X3,$mul($get(RelPos_X2),5))
Then replace these codes:
$drawrect(0,0,$add($get(RelPos_X),250),$add($get(RelPos_Y),250),255-0-0,)
$drawrect($add($get(RelPos_X),250),0,$add($get(RelPos_X),250),$add($get(RelPos_Y),250),0-255-0,)
To:
$drawrect(0,0,$add($get(RelPos_X3),250),$add($get(RelPos_Y),250),255-0-0,)
$drawrect($add($get(RelPos_X3),250),0,$add($get(RelPos_X2),250),$add($get(RelPos_Y),250),0-255-0,)
*The red rectangle gets 5/6 of additional width, and the green rectangle gets 1/6 of additional width)

You can change rectangles on this tutorial to any elements (i.e. panels) of your skin, the theory is same.
Hope this helps!
How to skin foobar2000 - Part 2
This is the re-uploaded version of "How to Skin foobar2000 Part 2" projects. All credits belongs to slowboyfast (the original poster).
Read other parts:!Markkoenig (https://www.deviantart.com/markkoenig) Part 1 - Basics:iconslowboyfast: Part 2 - Composition & Graphics:iconflipout69: Part 3 - Panel Switchers:iconflipout69: Part 4 - Avoiding truncated Panels
:iconflipout69: Part 5 - Elements Relative Position and Size
Composition & Graphics
In this part, you'll learn the basics of foobar graphic coding. You may think "graphic coding" sounds like something serious and hard, but once you've learned it, it'll be as easy as writing a DA Journal.
This part will focus
How to skin foobar2000 - Part 1
This is the re-uploaded version of "How to Skin foobar2000 Part 1" projects. All credits belongs to Markkoenig (the original poster).
I've been asked to write a tutorial on skinning foobar2000, because many f2k users encounter difficulties modifying skins or simply using them. I'm not an expert on the subject, I've started by installing a few skins and trying to understand how that worked ; I still think it's the best way to get a good handle on it, though a long and sometimes frustrating way. I invite you to try and see by yourself, to keep in mind that errors come all along and to share any advice, question, difficulty or anything
How to skin foobar2000 - Part 4
Read other parts:Part 1 - BasicsPart 2 - Composition & Graphics
Part 3 - Creating Panel SwitchersPart 4 - Avoiding Truncated PanelsPart 5 - Elements Relative Position and SizeAvoiding Truncated Panels
This is another trick I learned when creating JAM. The idea is, if you drag the foobar2000 window higher or wider, panels' row and/or column doesn't get truncated because lacks of space. For example if you use ELPlaylist and it has 560px of height, and you set each row to 50px, the panel will display 11 rows instead of 12 rows but the lowest row gets truncated. This trick is taking advantage of foobar2000 incapabilities of counting math down
JAM Projects Blog
I created a blog about my skins development, you can access it via http://jamfb2k.blogspot.com.
It contains all skins, tutorials and other things about foobar2000 I've submitted in DeviantArt, and you can also view other things, especially tutorials about skinning foobar2000.
See you there!
Featured in Groups

© 2016 - 2024 RanggaKat
Comments4
Join the community to add your comment. Already a deviant? Log In
thanks