... because there is always more!
[ If you missed Part I, you can read it here. ]
Better get something to drink, and perhaps a snack, because this one is a touch longer and also a slightly heavier read than the first part. Alas, it's still 65 pages shorter than the 'Beginner's Guide' mentioned in Part I, so I guess my claim of this being a TL;DR version still holds up.
That said, clean your screens and let's get into it!
What's this about then?
This is not so much a step-by-step ‘how to paint’ tutorial, as it is a tutorial about the various steps each painting tends to take, from the choice of canvas size to layer distribution, colour picking and final adjustments. But of course, a few tips and tricks about painting are in here, too.
There are many different ways of painting something, so I urge you to experiment; play around, try stuff, because that is the only way for you to find your personal painting process. I know I keep repeating myself with this, but over the years I have found that it really does need to be repeated, because people often get too hung up on what ‘the right way’ to paint is. There isn’t one. There are certain rules that need to be learnt - and observed - in regards to certain aspects of painting, but beyond that… pffft!
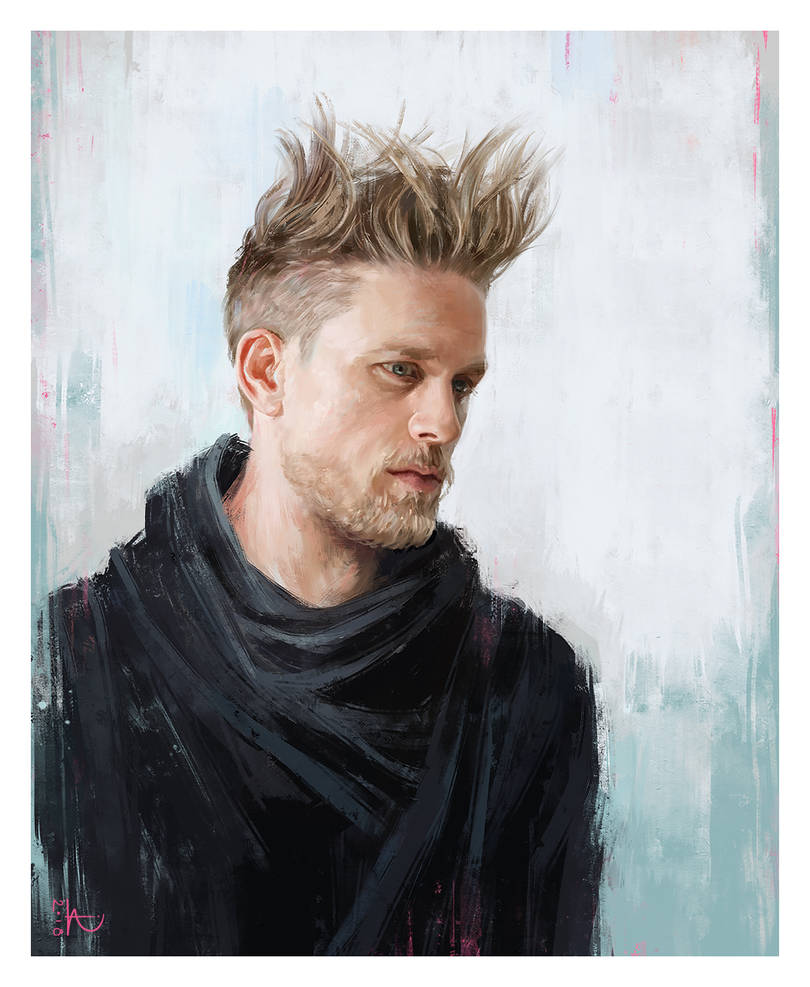
However, because I will need to show you things, I will do so by painting something. And as I am a figurative painter, it’ll be a portrait. Of Charlie Hunnam. Because Mrs-Durden asked for it when I told her that I couldn’t decide whom to paint for this. You’re welcome. :}
When it comes to reference images, try and use high quality photos. The higher the quality, the better you will be able to see what you're painting. While this one is okay in size, the overall quality has taken a hit - likely from it being cropped, resized and saved for web use. This is no issue for me, as I know my way around human anatomy and am used to painting faces even without a reference, however if you are still learning, I'd advise against using something like this.
Step 1 - Opening a New Canvas
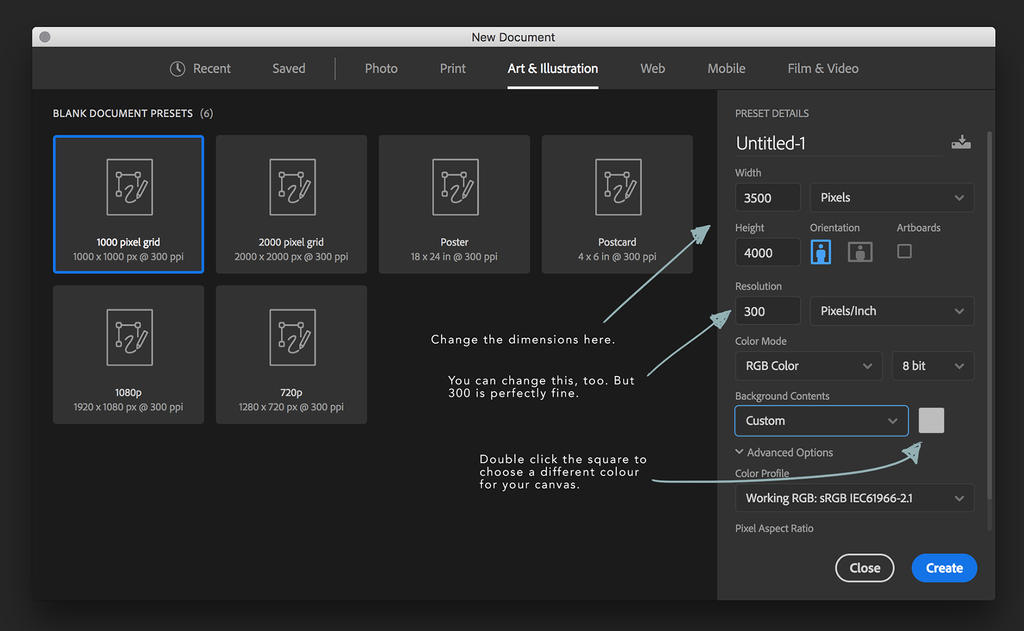
It is simple enough. All you need to do is click ‘File’ in the top Menu bar, then ‘New’ - it’s the same in all programs.
A window will pop up that lets you choose the background colour of your file, as well as the dimensions and the resolution (dpi - dots per inch, also referred to as ppi - points per inch). The last two are quite important, as they will determine the overall size and quality of your painting, specifically when printed.
As a general rule of thumb, dimensions of around 4000 pixels and 300 dpi will be just fine. Of course you can go bigger, but you may end up with some serious lag while working, depending on your computer, and it really is not necessary for most jobs. Magazines and books generally ask for image resolutions just like that - some ask for 600 dpi - and unless you want a large poster size print of your work, which requires anything from 6000 pixels up at 300 dpi, 4000 pixels is quite enough.
Also, your Colour Profile should be RGB for online viewing purposes as well as most fine art printing, unless you already know your artwork will be printed in CMYK, which is usually the case with magazines and books, then it might be a good idea to work directly in CMYK mode.
Step 2 - Sketching
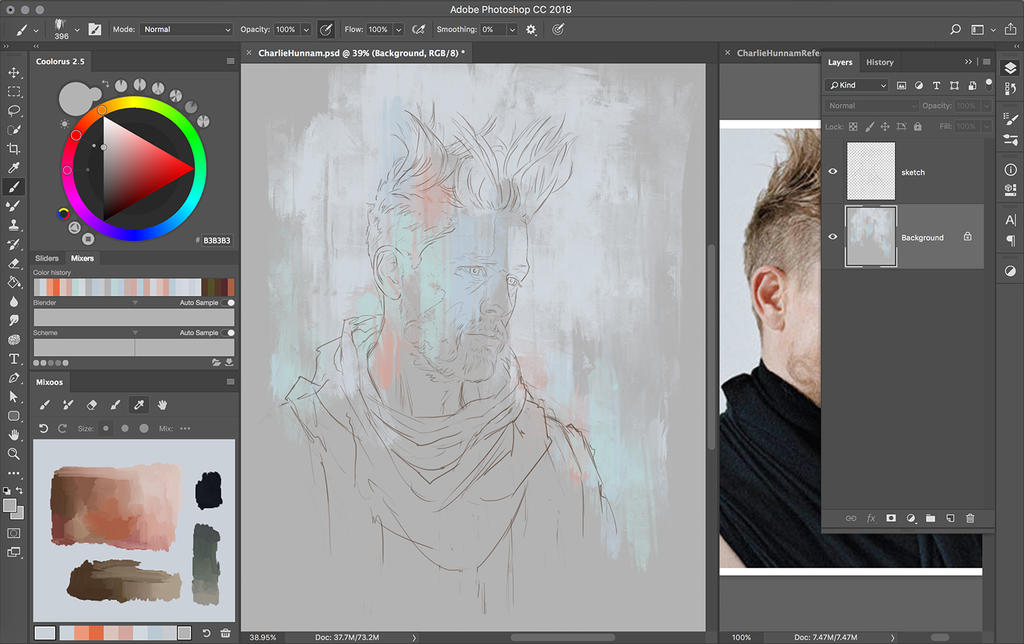
Whether you want to do meticulous line art or not, sketching out your subject can be very helpful, not only to get the overall composition right.
Doing a sketch on a new layer, rather than directly on the background, is ideal, as this will let you move it around without disturbing the background, and allows you to lower the layer’s opacity at any point in time - useful if it’s a rough sketch and you want to trace it with clean lines on yet another layer on top. It also makes it possible to keep the sketch visible throughout the painting process, if that is something you want or need, because the sketch layer can sit on top of any and all other layers you may add.
The brush I tend to use for detailed sketching is the simple hard round one, with Size, Opacity and Flow set to Pen Pressure. Of course you can choose to use any other brush you please - truth be told, I don’t always sketch things out, but start painting straight away, or just use basic, thick painted lines to guide me. Why? Because I truly suck at digitally sketching from reference and getting it right, unless I’ve painted the person at least 5 times. I’m better at that with a pencil on paper, or just digitally drawing a face without a reference.
However, I am using a reference here and want to get hunky Hunnam just right. That’s where the grid helps, or (shock horror!) quickly tracing the stuff you want, then filling in the rest freehand. Whatever works, because no one is going to give a peanut about how you did the initial sketch when they commission you for a painting. Honestly. Not a single soul.
Because if you cannot draw at all and always rely on tracing photos, you just shoot yourself in the foot, and you’ll fall flat on your face the moment someone wants you to paint something that, well… cannot be photographed. Also, a painstakingly traced sketch does not automatically mean it'll be a great painting. So do yourself a favour and learn how to draw at least a little before you go and take shortcuts.
Step 3 - Starting the Painting
There are so many different ways of starting a painting, and not one of them is right or wrong. It all depends on what you feel works best for you. Some people like to start in greyscale to get their values (lights and darks) right, others dive straight into full on colours. And that’s not even taking Matte Painting or Photo Bashing into consideration.
One thing though that most painters do is lay the ground work for the painting first, that is to say, they won’t paint details straight away, but stick to almost carving out simple shapes, much like a sculptor would do. This helps to get the general form right, as well as the distribution of light and shadow, before committing to details. Adding a hint of paint for the background can also help in this first stage.
I feel confident enough to know that I can simply paint on the background, without the need for further layers - at least for now. Besides, I like the results of that approach for quick portrait studies, as it has something a little more organic about it, or traditional if you will.
However, this does not mean it’s not perfectly okay to add a layer (or two, or three…) between your background and sketch layer to paint on. The one huge benefit you have doing that is that you can more easily paint your background, or change it should you wish to, without having to worry about your subject being touched by the paint.
Step 4 - Refining your Subject
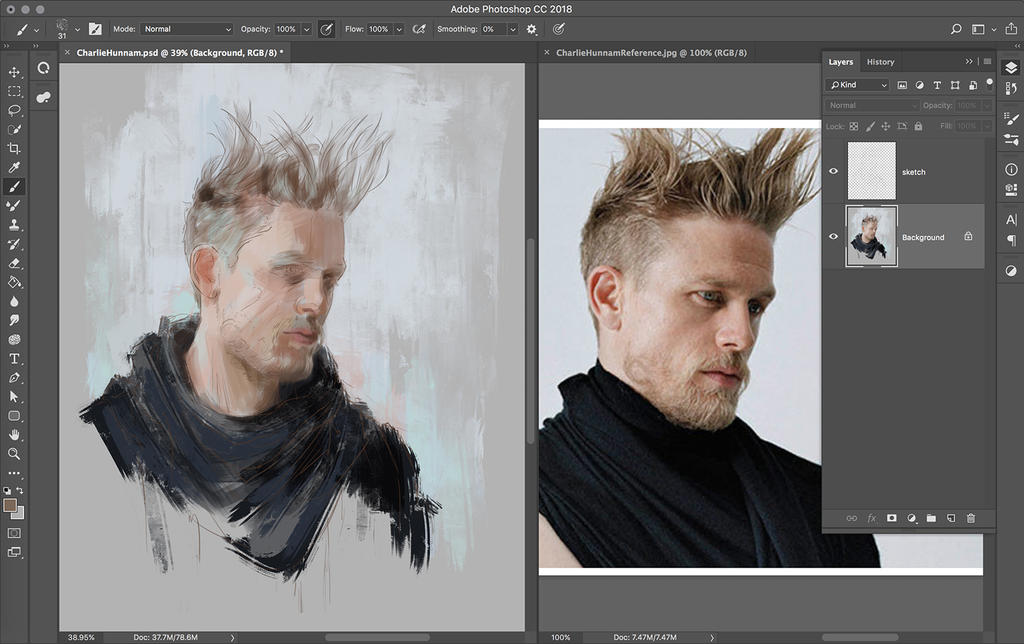
Once happy with the overall colour distribution, it’s time to start working on giving it all some more definition.
I personally still use a rough brush for this, because that’s the style I like for my quick studies. There is another plus side to a slightly bigger, rougher brush: It actually prevents you from going into detail, because it is just too big to do that. It also prevents you from over-rendering, keeping the colours (and edges!) clean - you want them to read well, not look like a muddy mess… unless you’re actually painting mud, that is.
This is also the point where I start to pick colours from the canvas to continue painting, as this helps me to get a range of tones that work well together, and it aids in pre-blending everything. A quick way of selecting colours from the canvas is to just hold down the ‘alt’ key on your keyboard while you have the Brush tool selected, as it switches to the Eyedropper for the length of time that you are pressing that key, so you can pick your colour!
Going light on your brush strokes would also do the trick, layering the colours rather than painting at full opacity.
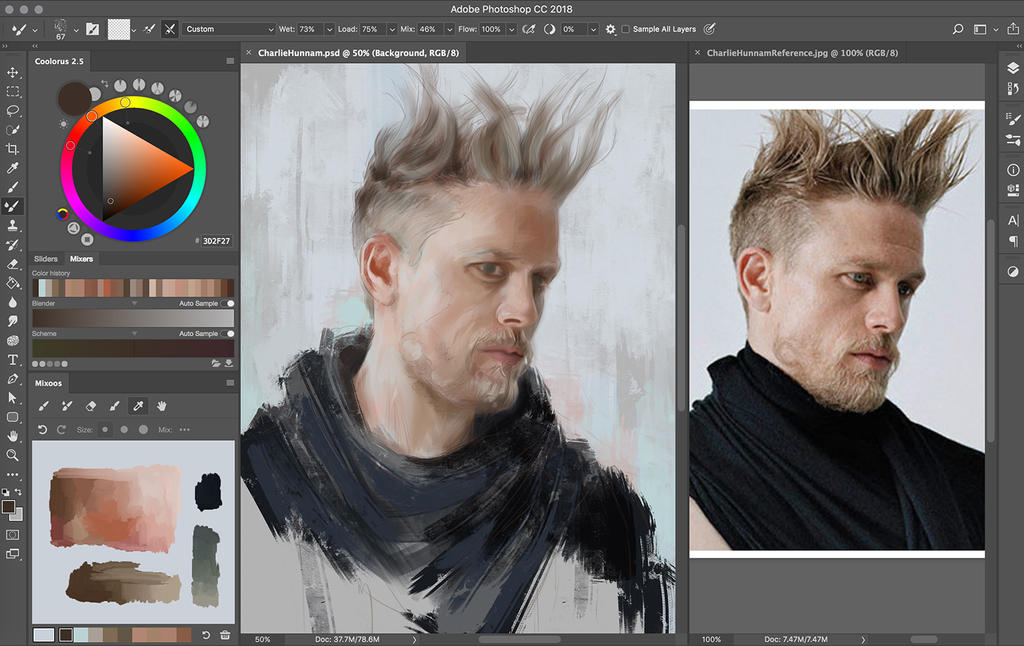
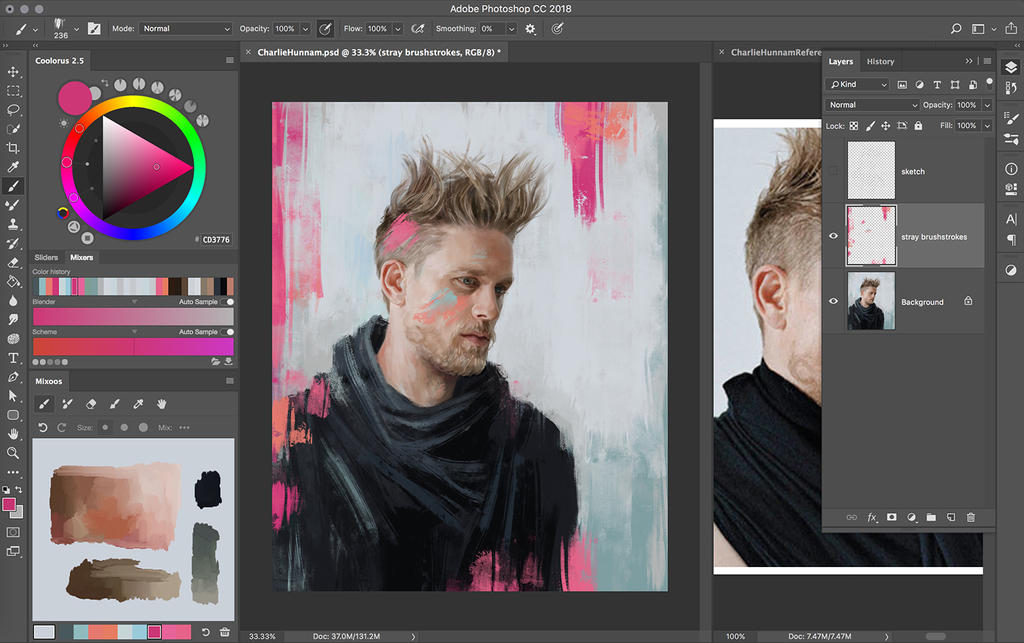
Using the Mixer Brush to lightly blend some key features of the face with the settings shown in the screenshot and a speckled brush tip, I just keep going, still keeping it loose. It’s your choice how much you want to blend the brush strokes, though from experience I found that leaving a trace of texture gives paintings more life.
Step 5 - Oh those Details
Keep looking at your reference! No, seriously, do - especially if you’re painting a real person whose likeness you want to capture. Giving up now would mean a half-right likeness.
That said, now is the point to get some of the finer details down. I never stick with just one brush for this, and often switch between a small rough one and the plain hard-edged round one, with size set to Pen Pressure. Manually lowering the opacity of your brush even further might come in handy in places.
Painting hair is often an issue for most beginners, so here’s a couple of things to look out for:
Paint it in sections or bundled strands, rather than as single hairs. Giving those sections a mild hair texture can be achieved by adding separate layers of hair painted with either a speckled brush for more coverage, or a small brush for single ‘fly-away’ hairs, and then adjusting the opacity and/or blending mode for those layers - Overlay, Multiply and Softlight work nicely.
Speaking of Softlight: Lowering the opacity of your sketch layer - if you still have it showing on top of your painting - would be good now, too. Alternatively you can set it to Softlight, as this makes it quite transparent, yet it still gives you some help.
PRO TIPPainting everything in excruciating detail is wholly unnecessary, as our brains will fill in any omitted details as long as the main structure is present. So you do not have to paint every single eyelash, unless you want to go into the realm of hyper realism.
Step 6 - More Details, Cropping & stray Brush Strokes
This is the final stretch of the process, and you probably want your painting to be done so you can show it off, but don’t rush now, or it might just end up looking a little bit unfinished.
Using some finer brushes, really go at it for a few targeted details, such as tiny highlights, lip texture, or even wrinkles. Check the reference while doing this, to really get it spot on. It doesn’t have to be an exact copy of the reference, but if you are painting a real person, try and get as close as you possibly can to capture their likeness. Oftentimes it can be something as silly as the curve of the lips or the length of the nostril that makes a person look different. The same goes for fictional characters, too: Most of the time, it’s something very small like the position of an eyebrow or a curling of the corner of the mouth that will completely change the expression, and thus the overall impression.
Also, Having most of it done, look over your image as a whole and see if perhaps it could benefit from a different crop. Sure, this is something that can (and should!) be done at various stages in the painting process, but sometimes it is only at the end of the process that you might feel it could use a chop here or there.
In this case, I only needed to take off a little bit on the left side. The Crop tool is easy enough to use, as it lets you move the sides as well as the corners of the Crop area, and also allows you to rotate your canvas. You can even make the canvas bigger with this tool, just bear in mind that the colour of the newly added sections will be your background colour, and you would have to fix that once you continue painting.
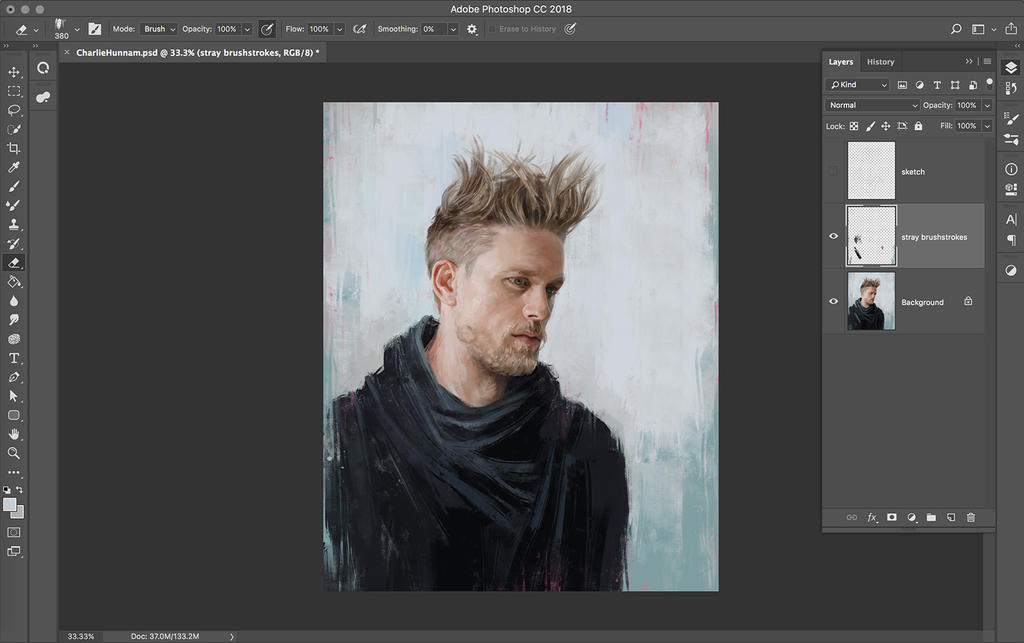
This is the point were I like to add some stray brush strokes, and this is where layers come in for me when I paint these kinds of portraits, as it gives me much more control over their placement and opacity.
It also means that the abomination I just created laying all those pink and orange strokes over the painting can be erased without damaging the painting underneath, and then things can be tinkered with until I arrive at a result I find visually pleasing:
Step 7 - Adjustment & Glazing Layers
Now it’s time to check the overall appearance of the painting: Are you happy with it? Are the colours just as you want them to be?
Bear in mind that different surround colours make your painting appear differently. The painting may look great on a dark background, but when you switch to a light coloured background (right click on the workspace background in photoshop, it will give you colour options there!), it just looks dull. And chances are that if it looks great on a light background, it will look just as good on a darker one.
Below is the same image on a white and on a black background. Judge for yourself.
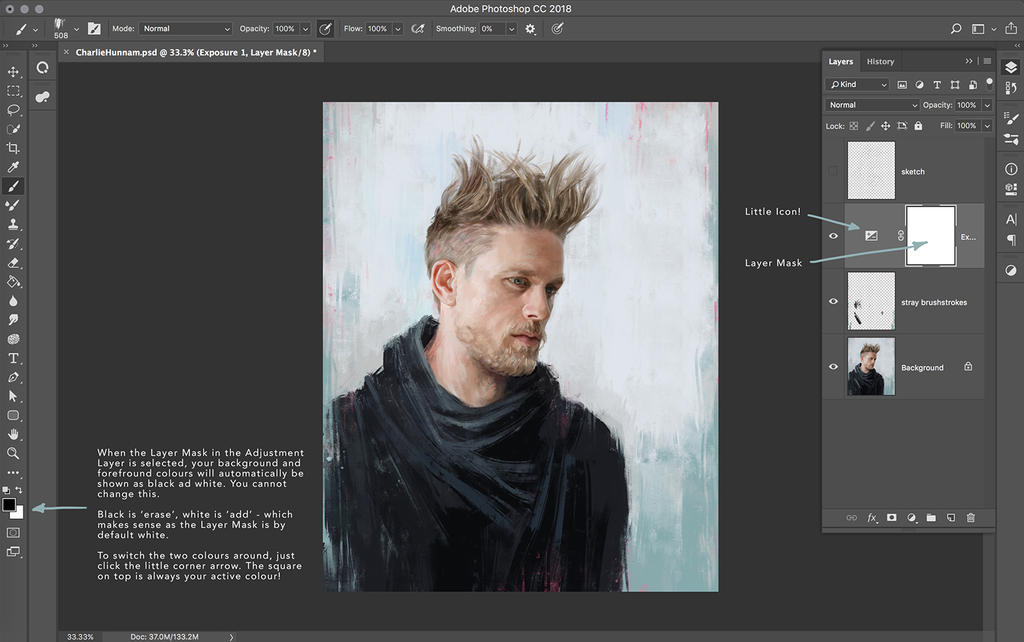
However, if the answer is no - like in this case - then it’s time to get busy using the Adjustment layers. Just click that little half black, half white circle at the bottom of the layer palette to get a menu of all the options you have, then take your pick. I’m starting with Exposure.
All you need to do is move the sliders, and once you’re happy with how your image looks, that’s it. Open your Layer palette again and you’ll see the Adjustment Layer right there. If you want to change the intensity of the adjustment, you can open up the sliders again by double clicking the little icon on the left of the layer, and the adjustments will pop up again.
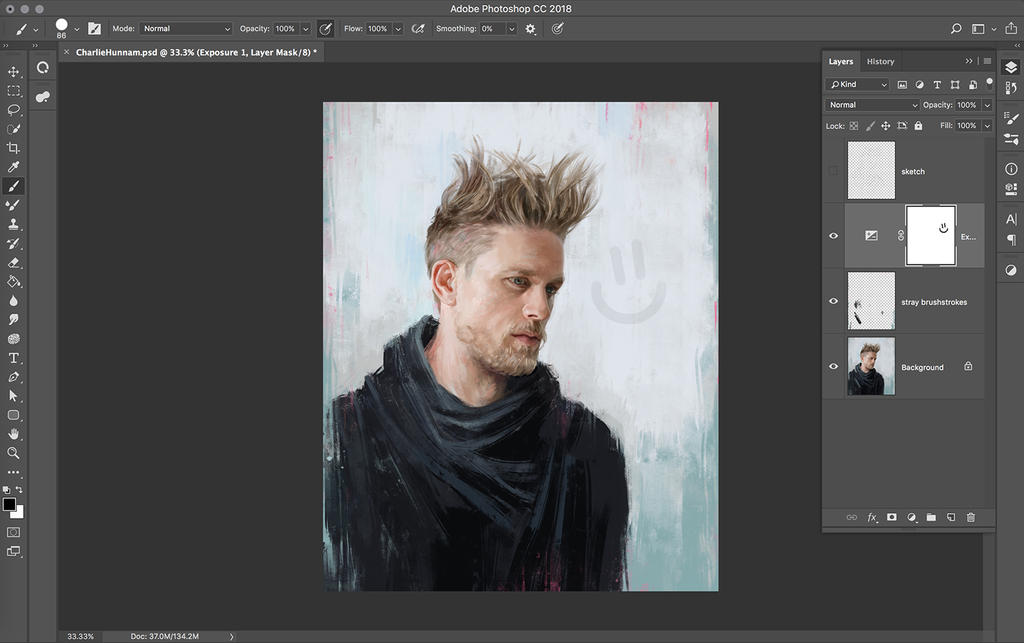
Something else that’s great with these layers is, if you feel that only one part of your image could use some adjustment, but not another part, you can remove the adjustment from those parts you don’t want it on. How? - Well, as the adjustment layer is in fact a Layer Mask, you can paint on it simply by clicking on the white square on the right side of the Adjustment layer, and then selecting your Brush tool and, well… painting on it.
Here’s a smilie face for you to demonstrate how to remove parts of a layer mask with your normal Brush tool…
Adding all the Adjustments you may want, your Layers may get a little full. This is were grouping layers comes in handy, not only to tidy up your palette. Select all the layers you want to group, and then simply click the little folder icon, and ta-daaa! You’ve grouped your layers.
What’s great about this is? Selecting the Group folder layer allows you to control all the layers inside it at once, while the layers themselves are not affected. So if you were to move one of the layers out of the group, and back amongst the rest of your layers, it would still be the same old layer you had before you stuck it into the group.
And that’s not all.
You can also adjust the image by adding some targeted glazing, much like in traditional art. This painting doesn’t need it, really, but for the sake of the article, I’ll do it anyway.
Adding a new layer, and selecting a brush that best suits your needs - in my case a larger, soft round one that only has Opacity and Flow set to Pen Pressure - choose a colour that you think will lend a nice touch to your painting. Want it less cool in tone? Choose some orange or warm yellow colours.
Set the Layer Mode to Softlight or Overlay, or even Multiply, or whatever other mode you want - cycle through them, see what works best for the painting. In my case, I chose Softlight. And you can only really see the difference if you switch the glazing layer on and off, but trust me, it’s there, that almost non-existent difference.
Step 8 - Flattening, Resizing, Sharpening & Saving
When you flatten the image (click ‘Layer’ in the top Menu bar, and all the way at the bottom you’ll find ‘Flatten Image’) you may want to do this to a copy. Keeping the layered version at hand can be beneficial, and be it just for your personal records.
If you want to have the image printed, there is no need to resize it. Many online art printing websites these days - such as Spectrum Photo, which is a fine art print studio, or Society6 and RedBubble, which are print on demand for artists to sell their work - will only use one file for all their different size prints, and they will print it at the aspect ratio of the original file, which means that no parts of your painting will be cropped. They will also add a 1 inch white border around your image, making it look very classy, and it saves you from having to do it yourself.
PRO TIPDo not ever make your image larger than the original file size, as the quality will suffer as pixels get blown up. Almost literally. The same effect can be seen when you save an image at the lowest quality. So yes, don’t do it. It’s very ugly.
However, to show your painting online, you will want to resize it to something a little more browser friendly. Generally, 1000 pixels on the longer side is a good size, or maybe even 1200 pixels. Of course you can go bigger, especially if you have a lot of things going on in your painting that you want to show in detail, like a space battle or city street scene, for example. Hit ‘Image’ in the Menu bar at the top, and you’ll find ‘Image Size’ in the dropdown - a little box will pop up when you click that.When reducing the size of a digital file, details often get lost, as the number of pixels is reduced. To counteract this, you can sharpen your image up a little. Really, just a little, as too much of it will make it look quite jarring. Click ‘Filter’ in the Menu bar, then ‘Sharpen’, and you’ll get a few choices there. I usually go with either ‘Unsharp Mask’, or - like in this case - ‘Smart Sharpen’.
This will not bring the pixels back, but it will at least give the appearance of them being there, somewhere.
PRO TIPIf you want to sign your painting, you can create a brush with your signature and stamp it onto a new layer, then resize and position it exactly where you want it before flattening the painting again.
Just for goodness sake, do NOT cover half the image with it. People want to see your work, not your signature covering your work. The same goes for watermarks. Just… no. There is a time and a place for watermarks, but finished paintings that you want to show off is NOT it. It’s just plain off-putting. And you know, if some salty little pretzel wants to steal your painting, they won’t care if it has a watermark on it; they’ll take it anyway.
If it’s for print, save it in the image format the print place recommends. If you cannot find a recommended image format anywhere, go for jpeg, at the highest quality.
For online viewing, jpeg is also your best choice. Keep the jpeg quality high, because you will want to show off your work in its best light, not as a pixel implosion like in the second picture above.
And now you’re ready to share it with the world!
In Closing
I hope you’ve found some useful things in these two articles. If you have any questions, feel free to ask them in the comments, and I’ll try and answer them as best as I can!

Additional Resources:
Coolorus & Mixoos
Colour Wheel and Mixing Palette shown in the screenshots

