ShopDreamUp AI ArtDreamUp
Deviation Actions

The blueprint of... is an article serie where we’re taking a closer look on an Artisan Crafts deviation and how it's made.
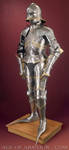
Today we are dissecting Gothic Armour - Full View. by Ageofarmour
My name is William Hurt. I am a (need to do the math)... 30 something... armourer from a small town in the hills above Palm Springs, California.

I started avidly making armour in the early 90's as I wanted to have something to wear when I proposed to my, then, girlfriend. We never ended up marrying but I did find a new love in making armour (Smile)")
This is a suit of armour made from 20 to 14 gauge 1018 steel, brass and leather in the German Gothic style of the late 1400s. Articulated and wearable, the armour stands a little over 6 foot tall and weighs approximately 65lbs.
I gather as many photos of the antique inspiration as I can find. Then I start making patterns of the larger pieces based on what I see in the photos. Patterning is difficult to explain and is a bit of a “Zen” process. The patterns are fairly basic and often need to be trimmed and refined during the project.
I rough form the steel using various hammers, stakes, anvils and wooden stumps. Once the largest plates have the correct, overall shape I planish the entire surface with a light, polished, flat faced hammer to even out any undulation and smooth away the rough hammer marks. I then pattern and form the pieces that connect to the main plates.

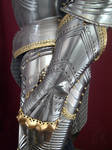
After all the plates in a component (for example: a breastplate/backplate and waist area assembly) are formed, I start working on the decorative elements. I place the plates on top of a large, blunted chisel then hammer recesses on either side of the chisel to form the fluting. The piercing is done by punching small starter holes in the armour then carving away designs in the steel using jeweler's files.


When all the parts have been formed, fit and decorated I sand away any surface imperfections then polish the armour. At this point the armour can be assembled using rivets at pivoting points and internal leather strips for articulation. The last stage is to make the spring latches, grommets, buckles and other hardware that is needed to make the armour wearable.

I have a very small work area about the size of a single car garage. Though it is a little cramped, the shop offers me enough room for all the tools I use regularly.
I try to use historical tools (or their historical approximate) whenever practical with a few exceptions. I cut the basic shape of the steel using a band saw, rather than a shear, as I find it a little easier. I use power sanders and buffers for the finishing and polishing. I would much rather use the giant, waterwheel powered buffers that appear illustrated in medieval manuscripts but, living in the desert, I don't have a good water source near by hehe.

Those power tools aside, the bulk of my work involves using a few anvils, stakes and various hammers. One of my most useful tools is simply a wooden stump. It can serve as a table or a surface to hammer on like a semi-soft anvil.
When I first tried making armour many years ago I had very little to draw from. There were fantasy paintings and movies but, while they may look good on film, they were not very comfortable or effective designs when put into practice. In addition, I had original designs of my own however, they also lacked real world functionality.
One day a friend brought over a book about arms and armour from his library. I thumbed through a few pages and, while I was impressed with some of the designs, they seemed odd to me because my only previous exposure to armour was from movies and fantasy art. Then a picture caught my eye... A photo of the armour of Archduke Sigismund of Tyrol. The armour was spikey yet conforming. It was absolutely covered from head to toe in fluting and piercing. The armour was very ornate and regal but also gave off a sinister look of seriousness. I think my comment was “That's the coolest thing I have ever seen in my life!” I looked to my friend and said “I'm going to make that someday.” to which we both laughed.
It was probably a few years after seeing that photo that I started on this suit. I worked on it as I had free time between custom orders and after hours. If I remember correctly I started making the suit in 1995 and it was finished in 2006.
Only a few years after I began the project the armour was wearable but I continued to refine and remake portions of it as my skill improved and I saw ways of improving it. Even after it was sold I remade a few of the parts while waiting for the customers check to clear.
In the beginning I was intimidated by the decoration. I wasn't too concerned about my ability to get the general shape correct. As it turns out I should have reversed my focus. The decoration, while very time consuming, was not as hard as I had feared and I am fairly pleased by how that aspect turned out. I look at the photos now and cringe at the lack of subtle refinement in the shape.
Yes and no... I am very happy I did it. The challenge taught me a lot but I know I can do better. Some things I knew I should have done better early on but instead I decided to sacrifice them to keep the cost from becoming prohibitively expensive.
Lots and lots of trial and error hehe. When I started making armour, prior to the modern Internet, there was essentially no information available about historical armour making. Once the armour making websites began forming, like the Armour Archive (armourarchive.org), enthusiasts were able to share and compare their findings with others. Now new armourers can spend less time with trial and error on the basic techniques giving them more time to experiment with advanced challenges.
It is exciting to see such a revival of the art. Many new, very talented armourers are emerging to help rediscover lost techniques and bring history to life.
Yes. Taking photos of the finished armour is something I look forward to through the whole project. As I am forming, ideas come about how I would like to light and photograph the armour. I have always loved the photography in Architectural Digest and often visualize product shots as if they were for a piece of jewelry or fine furniture. Unfortunately I am not nearly as skilled as the photographers who inspire me so I always miss the mark.

I once had a visit from a photographer who specialized in automobile advertising. He said the trick to photographing shiny things was to avoid any direct lighting and to rely only on reflections. He showed me a few of his sets, built in aircraft hangers, which had giant screens all around the cars. Onto these screens he projected landscapes or psychedelic patterns that the car's paint, chrome and glass would reflect. His advice was truly impressive and insightful.
The best tip I can offer is to have confidence and patience. By confidence I don't mean to be egotistical but rather to understand that it can be done and be done by you. I assume that is true for any art form.
I believe what stops many from making armour is that steel is very intimidating at first. It seems so unyielding. If you're confident enough to try forming metal and are patient enough to see the first project through to the end you will find a whole new world of possibilities. After that the rest is just refinement of that skill.
Yes, I have been working as a full time armourer for about a decade and a half. It is a very meager living because of the time involved in each project, but what it lacks in money it more than makes up for in enjoyment. I am compelled to extend my thanks to the wonderful and patient customers around the world who have so kindly provided me the opportunity to work as an artist.


Thank you Ageofarmour for participating and taking the time to answer my question!
//Myana
I'd love to recive suggestions for next "victim" to interview! Note me with a link to the deviation you'd like to know more about and I'll contact the deviant.
Previous articles:
• The blueprint of... My Little Alien by Spippo
• The blueprint of... Devil Claw Gargoyle by ART-fromthe-HEART
• The blueprint of... 30 full view by vankuilenburg
• The blueprint of... Flying Jewel Ring by LaughingScarab
• The blueprint of... Golden Chinese Dragon by Richi89
• The blueprint of... Leather corset by tupali
• The blueprint of... Galding's Runesmith Armor by farmerownia
• The blueprint of... corset with gussets by crissycatt
• The blueprint of... Red Cross 9.26.08 by UniquelyYours
• The blueprint of... Rosemary 1 by dollmaker88
• The blueprint of... Tsuru by merimask
• The blueprint of... Duct Tape Queen Of Hearts by DuckTapeBandit
• The blueprint of... Snekkja by Thorleifr
• The blueprint of... Dragon Chain Revisited by StephaniePride
• The blueprint of... More Vessels by ellyloo
• The blueprint of... Cosplay: Belle by Adella
• The blueprint of... Calla Lilly Chocolate Box by Sliceofcake
• The blueprint of... Louis Vuitton Hand bag cake by Dragonsanddaffodils
• The blueprint of... Red wave glass tile pendant by inchworm
• The blueprint of... Pharoah's Horses by indeestudios
• The blueprint of... Copper Mech Dragon by NycterisA
• The blueprint of... Armor by flintlockprivateer
• The blueprint of... Shrimp by YAGGOB
• The blueprint of... Tears of a Clown B by cdlitestudio
Today we are dissecting Gothic Armour - Full View. by Ageofarmour
First off, please introduce yourself?
My name is William Hurt. I am a (need to do the math)... 30 something... armourer from a small town in the hills above Palm Springs, California.
I started avidly making armour in the early 90's as I wanted to have something to wear when I proposed to my, then, girlfriend. We never ended up marrying but I did find a new love in making armour
Please explain what we are viewing.
This is a suit of armour made from 20 to 14 gauge 1018 steel, brass and leather in the German Gothic style of the late 1400s. Articulated and wearable, the armour stands a little over 6 foot tall and weighs approximately 65lbs.
Can you describe for a layman how it’s made?
I gather as many photos of the antique inspiration as I can find. Then I start making patterns of the larger pieces based on what I see in the photos. Patterning is difficult to explain and is a bit of a “Zen” process. The patterns are fairly basic and often need to be trimmed and refined during the project.
I rough form the steel using various hammers, stakes, anvils and wooden stumps. Once the largest plates have the correct, overall shape I planish the entire surface with a light, polished, flat faced hammer to even out any undulation and smooth away the rough hammer marks. I then pattern and form the pieces that connect to the main plates.
After all the plates in a component (for example: a breastplate/backplate and waist area assembly) are formed, I start working on the decorative elements. I place the plates on top of a large, blunted chisel then hammer recesses on either side of the chisel to form the fluting. The piercing is done by punching small starter holes in the armour then carving away designs in the steel using jeweler's files.
When all the parts have been formed, fit and decorated I sand away any surface imperfections then polish the armour. At this point the armour can be assembled using rivets at pivoting points and internal leather strips for articulation. The last stage is to make the spring latches, grommets, buckles and other hardware that is needed to make the armour wearable.
What tools did you use?
I have a very small work area about the size of a single car garage. Though it is a little cramped, the shop offers me enough room for all the tools I use regularly.
I try to use historical tools (or their historical approximate) whenever practical with a few exceptions. I cut the basic shape of the steel using a band saw, rather than a shear, as I find it a little easier. I use power sanders and buffers for the finishing and polishing. I would much rather use the giant, waterwheel powered buffers that appear illustrated in medieval manuscripts but, living in the desert, I don't have a good water source near by hehe.
Those power tools aside, the bulk of my work involves using a few anvils, stakes and various hammers. One of my most useful tools is simply a wooden stump. It can serve as a table or a surface to hammer on like a semi-soft anvil.
What was your inspiration in creating this?
When I first tried making armour many years ago I had very little to draw from. There were fantasy paintings and movies but, while they may look good on film, they were not very comfortable or effective designs when put into practice. In addition, I had original designs of my own however, they also lacked real world functionality.
One day a friend brought over a book about arms and armour from his library. I thumbed through a few pages and, while I was impressed with some of the designs, they seemed odd to me because my only previous exposure to armour was from movies and fantasy art. Then a picture caught my eye... A photo of the armour of Archduke Sigismund of Tyrol. The armour was spikey yet conforming. It was absolutely covered from head to toe in fluting and piercing. The armour was very ornate and regal but also gave off a sinister look of seriousness. I think my comment was “That's the coolest thing I have ever seen in my life!” I looked to my friend and said “I'm going to make that someday.” to which we both laughed.
How long time did it take you to make this?
It was probably a few years after seeing that photo that I started on this suit. I worked on it as I had free time between custom orders and after hours. If I remember correctly I started making the suit in 1995 and it was finished in 2006.
Only a few years after I began the project the armour was wearable but I continued to refine and remake portions of it as my skill improved and I saw ways of improving it. Even after it was sold I remade a few of the parts while waiting for the customers check to clear.
Did you run into anything unexpected while creating?
In the beginning I was intimidated by the decoration. I wasn't too concerned about my ability to get the general shape correct. As it turns out I should have reversed my focus. The decoration, while very time consuming, was not as hard as I had feared and I am fairly pleased by how that aspect turned out. I look at the photos now and cringe at the lack of subtle refinement in the shape.
Are you happy with the result?
Yes and no... I am very happy I did it. The challenge taught me a lot but I know I can do better. Some things I knew I should have done better early on but instead I decided to sacrifice them to keep the cost from becoming prohibitively expensive.
Where have you learnt your skills in this area?
Lots and lots of trial and error hehe. When I started making armour, prior to the modern Internet, there was essentially no information available about historical armour making. Once the armour making websites began forming, like the Armour Archive (armourarchive.org), enthusiasts were able to share and compare their findings with others. Now new armourers can spend less time with trial and error on the basic techniques giving them more time to experiment with advanced challenges.
It is exciting to see such a revival of the art. Many new, very talented armourers are emerging to help rediscover lost techniques and bring history to life.
Do you take your own photos? Any tips you want to share for presenting your work?
Yes. Taking photos of the finished armour is something I look forward to through the whole project. As I am forming, ideas come about how I would like to light and photograph the armour. I have always loved the photography in Architectural Digest and often visualize product shots as if they were for a piece of jewelry or fine furniture. Unfortunately I am not nearly as skilled as the photographers who inspire me so I always miss the mark.
I once had a visit from a photographer who specialized in automobile advertising. He said the trick to photographing shiny things was to avoid any direct lighting and to rely only on reflections. He showed me a few of his sets, built in aircraft hangers, which had giant screens all around the cars. Onto these screens he projected landscapes or psychedelic patterns that the car's paint, chrome and glass would reflect. His advice was truly impressive and insightful.
What is the best tip you can give to others wanting to test this craft/material/technique?
The best tip I can offer is to have confidence and patience. By confidence I don't mean to be egotistical but rather to understand that it can be done and be done by you. I assume that is true for any art form.
I believe what stops many from making armour is that steel is very intimidating at first. It seems so unyielding. If you're confident enough to try forming metal and are patient enough to see the first project through to the end you will find a whole new world of possibilities. After that the rest is just refinement of that skill.
Are you selling your work?
Yes, I have been working as a full time armourer for about a decade and a half. It is a very meager living because of the time involved in each project, but what it lacks in money it more than makes up for in enjoyment. I am compelled to extend my thanks to the wonderful and patient customers around the world who have so kindly provided me the opportunity to work as an artist.
Thank you Ageofarmour for participating and taking the time to answer my question!
//Myana
I'd love to recive suggestions for next "victim" to interview! Note me with a link to the deviation you'd like to know more about and I'll contact the deviant.
Previous articles:
• The blueprint of... My Little Alien by Spippo
• The blueprint of... Devil Claw Gargoyle by ART-fromthe-HEART
• The blueprint of... 30 full view by vankuilenburg
• The blueprint of... Flying Jewel Ring by LaughingScarab
• The blueprint of... Golden Chinese Dragon by Richi89
• The blueprint of... Leather corset by tupali
• The blueprint of... Galding's Runesmith Armor by farmerownia
• The blueprint of... corset with gussets by crissycatt
• The blueprint of... Red Cross 9.26.08 by UniquelyYours
• The blueprint of... Rosemary 1 by dollmaker88
• The blueprint of... Tsuru by merimask
• The blueprint of... Duct Tape Queen Of Hearts by DuckTapeBandit
• The blueprint of... Snekkja by Thorleifr
• The blueprint of... Dragon Chain Revisited by StephaniePride
• The blueprint of... More Vessels by ellyloo
• The blueprint of... Cosplay: Belle by Adella
• The blueprint of... Calla Lilly Chocolate Box by Sliceofcake
• The blueprint of... Louis Vuitton Hand bag cake by Dragonsanddaffodils
• The blueprint of... Red wave glass tile pendant by inchworm
• The blueprint of... Pharoah's Horses by indeestudios
• The blueprint of... Copper Mech Dragon by NycterisA
• The blueprint of... Armor by flintlockprivateer
• The blueprint of... Shrimp by YAGGOB
• The blueprint of... Tears of a Clown B by cdlitestudio
Exciting news: New job!!
Theater carpenter
Last week I started a new job as a carpenter at the city's theater, I'll be doing backdrops/coulisses, props, furnitures and much more. I'm quite excitied to be working much more creative and to be back in a workshop. :yay: (The job I've had for the last year have been reparing stuff at people's houses.)
Hopefully they'll let me photograph what I do and if so, you'll see it :)
New camera
And to celebrate my new job, I went a bought myself a new camera. I couldn't spend too much on it, but I went with Canon EOS 550 D with a 18-135 objective. I'm really satisfied with it. Now I'm waiting for spring so I go out and shoot :)
Not dead
Wow, first submissions in over a year!!
Everyone, I'm aliiiiive! :P
Although I'm probably not gonna be any more active, I just wanted you to know I'm doing great. Svante is soon 2.5 years and offcourse he's a bundle of joy!
How are you all?
:thumb197524914: :thumb197526347:
ArtisanCraft Group
Groups
As you know by now, the new shiney Group-system is in BETA now and lots and lots of clubs are converted to it.
#ArtisanCraft (https://www.deviantart.com/artisancraft) ArtisanCraft (https://www.deviantart.com/artisancraft) has successfully converted to a group and I was delighted to be asked by MyntKat (https://www.deviantart.com/myntkat), who is handling the wheel on that ship now, if I wanted to be part of the club as co-admin again. Of ocurse! I will try to be a little more active, both on the club and on my personal account.
I've only played with the group a little, but man - I love it! The things I've seen is making the life of a group-admin soooo much easier. Way to go, tech team of dA! We salute you!! :heart:
Recent AC fav's
:t
The blueprint of... Red Tailed Hawk 2
The blueprint of... is an article series in which we’re taking a closer look at an Artisan Crafts deviation and how it's made.
Today we are dissecting Red Tailed Hawk 2 by Bagheera3 (https://www.deviantart.com/bagheera3)
:thumb125509468: :thumb125509249: :thumb125509468:
First off, please introduce yourself?
My name is Bill Douglas and I live in Ontario, Canada. I am 68 years old and I started carving as a hobby, 12 years ago.
Please explain what we are viewing.
This is a red-tailed hawk which I carved from tupelo wood. It is approximately 1/4 life-size. I made it in 2006. It is painted with acrylic paint.
Can you describe for a layman how it’s made?
I start
© 2009 - 2024 Myana
Comments6
Join the community to add your comment. Already a deviant? Log In
another excellent interview with an awesome craftsman! 